Showing posts with label Ubuntu. Show all posts

Friday, February 1, 2013

Graduating from Ubuntu and moving to Arch Linux


Arch Linux, a rolling release and highly customizable GNU/Linux distribution

I've recently left Ubuntu and migrated to a new GNU/Linux distribution: Arch Linux. The process wasn't easy, as the learning curve of Arch Linux is steeper than the Ubuntu learning curve, but it has been immensely gratifying. This metamorphosis has taught me more about Linux that what I could have learned from staying in Ubuntu.

Not only have I learned new things but I have built a fully customized Operating System that fits my needs and boosts my productivity. This is the main difference between Arch Linux and Ubuntu, the former comes with the bare minimum to run, whereas the latter comes with batteries included. This implies the Arch user must choose his/her Desktop Environment, his/her Development Tools, his/her Media Player, his/her Web Browser, etc.

This plethora of choices may be overwhelming for the newcomer but this ultimate freedom is Arch Linux strongest feature. I believe that thanks to being forced to choose, the user will ultimately find what best fulfills his/her needs instead of sticking to the default, which may not be the optimum. This search for the best apps may be time consuming, but I think it eventually pays off in terms of productivity and conform.

Now, without further ado, I'll share my findings, what works the best for me, and I hope this insight will help you in building your ultimate Operating System.

Standing on the shoulder of giants


The Arch Linux philosophy (The Arch Way): The user has complete control and responsibility over ther system

It's important to mention that a I've received a lot of help into building and tweaking my system from the Arch Wiki. The information contained there has taught me a lot about how Linux works, has saved me lot of time troubleshooting problems and has provided helpful insight on selecting and setting up software.

On the cutting edge, with great power, comes great responsibility


And Ubuntu 12.10 uses the version 3.5 of the kernel

Arch Linux is a rolling release distribution, this means you won't see a new version of Arch Linux coming out every 6 months, like Ubuntu does. Instead you get access to new software as soon as it has been tested to be relatively stable.

This means you'll live at the cutting edge and have access to the latest features implemented in your favorite software, but also means you should be ready to tackle the bugs that may come with the latest software.

The User Repository: Build It Yourself!


The most voted user packages in Arch Linux

As with other GNU/Linux distributions, you can easily install software from the packages available in the official repository using pacman, the Arch Linux package manager. But there are times when you need a software that isn't available in the official repository. On many distributions this either means that you are on your own and will need to compile the software from source, or you depend on someone who might have built a binary compatible with your distribution/version.

On Arch Linux, you have the AUR (Arch User Repository), where the build instructions (PKGBUILD) are uploaded. This means that you'll build yourself a binary that does work with your system. And for the exciting part, AUR has system for commenting, voting and flagging outdated packages. This means that the community will be alert and vigilant about the correctness of the build instructions.

The Desktop Environment: From Unity to Gnome 3


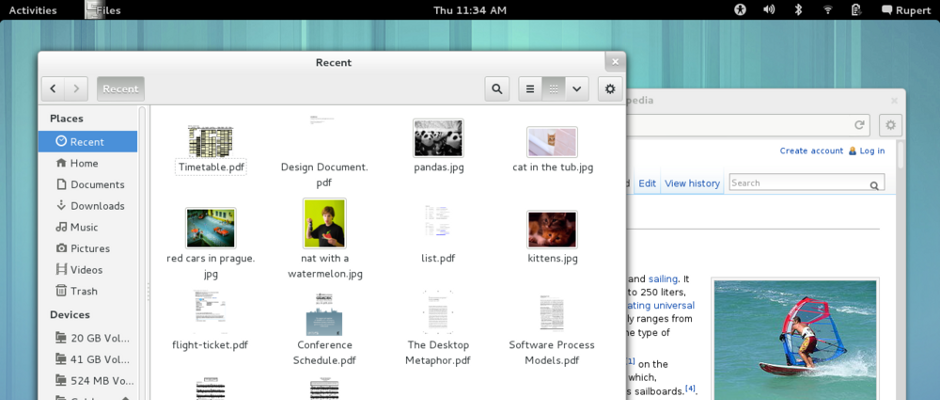
IMO, out of the box Gnome 3 looks better than out of the box Unity
(Images from ubuntu.com and gnome.org)

My first Linux distro was Ubuntu 11.04, Natty Narwhal, and I arrived just in time to test Unity, which became the default GUI in that release. Coming from the "W" OS, the change was abrupt, and for me it was a total redefinition of the desktop experience.

I quickly became attached to the feature of workspaces, which are common in Linux Desktop Environments, and even established the policy of having one application per workspace for faster switching, instead of alt-tabbing through many apps.

I loved the concept of adding extensions to the top panel for extra information and features, but to the date I still don't understand why some people use the application extension, that just reminds me of the start menu from the "W" OS (ewww), I guess some habits die hard.

I also liked the Unity Lens, a desktop search mechanism, until Canonical decided to add the opt-out Amazon search...
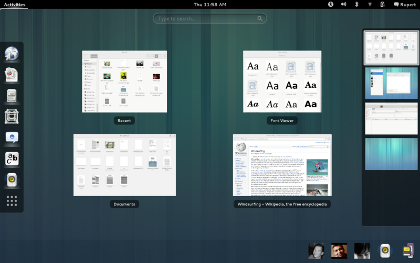
Out Unity, enter Gnome 3!
(Image from www.gnome.org)

But enough of reminiscing, and fast forwarding to my migration to Arch Linux. Just after I installed the base system and had to select a Desktop Environment, I found out that Unity was not in the official repositories and I didn't know at that time about AUR. In need of a new DE, I choose the most similar to Unity: Gnome 3.

And Gnome 3 just rocked my world:
  • It just looks better than Unity!
  • Do you like workspaces? We have dynamic workspaces
  • Do you like the top panel? You can install and manage your extensions from the web
  • On Unity, the Super key only let's you search/launch apps, on Gnome it launches the Activities Overview, where you can do the same but also switch apps/workspaces and close apps in the current workspace
  • I love the hot corner, it launches the Activities Overview using the mouse, and I use it to switch applications/workspaces when my hand is already on the mouse
  • Notifications! (not available in Unity), they are just awesome, many apps can report useful information in an unobtrusive way with these notifications

On the way of Vim


Vim, the fastest editor in the world (?)

Continuing with the productivity improvements, I decided to try the legendary vim editor. Many things are said about vim like: "vim allows you to edit text at of the speed of thought". I'm not quite there yet, but releasing yourself from the mouse does speed up the editing, but only if you're a touch typist and after you have quite a bit of practice with this editor.

The learning curve is quite steep, when I started with vim my productivity went down, but after the struggle of learning the basics I was back to normal. What gives you the real boost are vim superpowers, namely: buffers, windows, the infinity of plugins and some stuff I haven't heard about yet.

To stay committed to my learning of vim, I'm forcing myself to use vim, by enabling it wherever it's possible:

I think you get the point... The side effect is that I'm improving my productivity daily!

Drop Down Screen for the win


Always available command line applications with the Gnome Drop Down Terminal and Screen

I'm a heavy user of the command line, I prefer using the keyboard that using the mouse, and pressing a key shortcut is always faster than moving the mouse to some menu and selecting an action.

Therefore I needed a way of quickly accessing multiple terminals. Opening and closing terminal when needed resulted in launching delays, and having multiple terminal windows open only added clutter to the desktop.

With Drop Down Terminal you can have a terminal permanently open, which can be hidden from view without closing it and called it back without the launching delay. And Screen lets you manage multiple command line applications in one terminal.

For more information you can check my post: Multitasking in the command line with Screen.

Conky, the system monitor


Conky, the customizable system monitor

Accessing your system information is important to spot any CPU/memory leak, or to monitor the network bandwidth usage, among other tasks related to maintenance.

You can have pretty much all of this information by adding gnome extensions called indicators. But there are three problems with this approach:

  • You'll fill your top panel with a lots of indicators, leaving little space for other extensions.
  • Again, due to limited space you can only view a small piece of information for each indicator.
  • To access a more detailed report, you'll need to click on each indicator, which is slow and energy consuming.

As you can see in the screenshot above, Conky lives in your desktop and let's you access all the information you need/want thanks to its .conkyrc file, and also solves the three problems of the indicators:
  • With Conky, you can get rid of all or most of the indicators in the top panel.
  • You can customize Conky to display all the information you want/need.
  • You can easily access to Conky using a keybinding to show the desktop, which is way faster than the mouse.


The Z shell, like bash but improved


bash + better autocompletion + lots of themes + auto cd + git integration + ... = zsh

Bash is a great shell, but the Z shell is easier to customize, which can give you superpowers if correctly customized. Using the out of the box version of zsh feels a lot like bash, but thanks to the project oh my zsh, you can get a fully customized zsh that beats vanilla bash.

These are the most relevants features of zsh customized with "oh my zsh", that beat bash:
  • Case insensitive auto completion.
  • Double tab, let's you choose among the list of suggestions.
  • Auto cd, you don't need to type the cd command, typing only the name of the directory is enough to change the file path.
  • With the Git integration, you can add to the shell promp information about the git repository you are currently in.

MPD: The daemon of music


MPD + ncmpccp, a ncurses based client.

The Music Player Daemon (MPD) is a daemon (a process that runs in the background) that uses your audio device to play music stored in a certain folder (the database) according to the order established in the playlist folder.

However to send commands like play, pause, next, etc to the MPD, a client is necessary. My choice of client is ncmpccp, which is a terminal based client that uses the ncurses library to implement a user interface.

The rationale of the selection, is again that the keyboard is faster than the mouse, also not having a GUI saves resources and finally this client can be integrated in my drop down Screen.

I have also installed mpDris2 and a gnome extension to control MPD via the top panel, this combination also enables notifications, which you can see in the above screenshot.

That's all!


Those are the applications I use everyday and that have boosted my productivity. There are many other applications that I use but they may not be so useful for the average user.

If you are an Archer, please feel free to share your favorite application in the comment section.

Tuesday, January 29, 2013

Demo: STM32F4 + OV7670 + qSerialTerm

Yup, that mess of wires actually works.

In this post I'll cover 3 basic demo programs for the STM32F4 to interface the OV7670. Additionally, I've use qSerialTerm to receive data from the uC and display it in a human readable form.

I assume you know how the OV7670 works and have some knowledge about common peripherals found in uC (GPIO, USART, DMA, etc).

The board used in this demo was the custom development board: F4Dev. The STM32F4DISCOVERY wasn't used and can't be used because the Digital Camera Interface (DCMI) peripheral pins are not fully available in that development board.

I've used bareCortexM, an Eclipse based IDE, and libstm32pp, a template peripheral library, to develop these demos for the STM32F4.

The following configuration applies to all the demos:
  • The STM32F4 operated at 42 MHz, the system clock, the AHB clock, the APB1 clock and the APB2 clock, all of them operated at this frequency.
  • This 42 MHz frequency was obtained from the uC High Speed Internal (HSI) oscillator, which runs at 16 MHz, after scaling up the frequency using the uC internal PLL.
  • The MCO1 pin was configured to output the HSI clock (16 MHz) and this output was used to drive the OV7670 XCLK.

Demo 1: Scanning the SCCB bus (Code)


In this first demo, the STM32F4 will interface the OV7670 using a bit bang implementation of the SCCB protocol.

The uC will wait until the letter 'S' is received on the USART1 interface. Upon receiving this signal, the uC will read all the internal registers of the OV7670 using the SCCB interface.

After scanning all the OV7670 registers. The uC will report the address and values of the registers via the USART1 in a human readable format.

Default values of the internal registers of the OV7670

You can find the log file of the uC output here.

Under the hood details: The formatting was done using the printf function.

Demo 2: Reading a frame and visualizing the data in hex format (Code)


In this second demo, the STM32F4 will interface the OV7670 using the Digital Camera Module Interface (DCMI) to grab a frame from the OV7670 and then display the data in hexadecimal format.

The uC will wait until the letter 'S' is received on the USART1 interface. Upon receiving this signal, the uC will use the DCMI in single shot mode to grab one frame from the OV7670.

After capturing the frame, the uC will send all the data via the USART1 interface in a human readable hexadecimal format.

Frame taken in a pitch black environment. Data in hex format.

You can get the full log file here.

Under the hood details: The DCMI peripheral works hand to hand with the DMA peripheral. The data that is captured by the DCMI is moved by the DMA to a predetermined memory address without intervention of the uP. The formatting was done using the printf function.

Demo 3: Reading a frame and visualizing the data as an image (Code)

The last demo is pretty similar to the second demo. The difference is that the uC reports the frame data in binary form. On the PC side, this binary data is parsed and displayed in qSerialTerm.

Frames captured by the OV7670. Left: A electrical tape. Right: Pitch black image.

Under the hood details: After capturing the frame, the data was sent through the USART interface using the DMA peripheral.

That's it. You have access to my full code, both the STM32F4 firmware and the qSerialTerm are fully available to you. I hope this information will help you in projects that involve the OV7670.

Monday, January 28, 2013

Augmenting Octave with Vim

Integrating the powerful mathematical package, Octave, with the flexible editor, Vim.

Today, I'm sharing some tips to use the vim editor inside the Octave interactive command line.

The octaverc file


The first thing towards customizing Octave is creating an .octaverc file, if you don't have one already. The .octaverc file holds some Octave commands that are executed every time you launch Octave.

We'll work with the .octaverc file that lives in your home directory, which is user specific.
# Create/modify .octaverc in your home folder
vim ~/.octaverc
A good starting .octaverc file looks as follows:

Using vim as editor in Octave


Next, let's set vim as the default editor in Octave. (source of information)
# Add extra configuration
vim ~/.octaverc
Open the .octaverc file and append the following:
Now you can call vim from within Octave, and use it in command line mode, i.e. without opening an (unnecessary) additional window.

As a bonus you get a function template.

Now, let's tweak vim for extra features!

Adding syntax highlighting


We'll add syntax coloring/highlighting to vim. Similar to the .octaverc file, vim also has a configuration file named .vimrc. Before touching the .vimrc file, you'll need to grab a vim syntax file from here (grab the latest version).

Next you'll need to drop that octave.vim file in the following directory: ~/.vim/syntax.
# If you don't have the folders already
mkdir -p ~/.vim/syntax
mv /path/to/downloaded/octave.vim ~/.vim/syntax/octave.vim
Next, you'll need to append the following lines in your .vimrc file.
Let's try editing a file inside Octave again.

Added Octave syntax highlighting for vim.

Execute Octave scripts from within vim


Here is where the magic comes in. With this hack, you'll be able to test the octave script you are editing in vim, inside vim and without leaving vim. In other words, you'll be able to use the F5 key to run your script, just like you do in the Matlab editor.

Without further ado, you'll need to add this to your .vimrc
Let's test the magic.


Executing an Octave script from within vim using the F5 key in normal mode.

I need to inform you that this hack adds two extra lines of code to your script:

"pkg load all" at the beginning of your code. Which grants access to all functions inside the extra Octave packages.

"pause" at the end of your code. Without this you won't be able to see the plots drawn in your script.

When the execution of the script finishes, these two lines are removed.

That's all folks, happy coding!

Thursday, January 3, 2013

Beaglebone: Using an USB WiFi dongle to connect to wireless networks at boot.

I'll cover how I configured my BeagleBone so it now (automagically) connects to wireless networks at boot.

Note: I assume you are running Ubuntu 12.10 in your Beaglebone.

Manual connection


First, let's check whether the Beaglebone can use the WiFi dongle by setting up a manual connection.

Before starting the test, let's install some software with the ethernet cable plugged in:
#On the beaglebone
sudo apt-get install lshw
sudo apt-get install wpasupplicant
Now unplug the Ethernet cable from the Beaglebone. And start a connection using the USB emulated Serial connection.
# On the PC
screen /dev/<ttyUSBx> 115200
Now let's check if the Beaglebone has recognized the WiFi dongle.
# On the beaglebone
lshw -C network
I got this:
*-network:1 DISABLED
description: Wireless interface
physical id: 2
bus info: usb@1:1
logical name: wlan0
serial: d8:eb:97:12:e4:c0
capabilities: ethernet physical wireless
configuration: broadcast=yes driver=rtl8192cu driverversion=3.2.33-psp26 firmware=N/A multicast=yes wireless=IEEE 802.11bgn
If you see something similar, it means your device has been detected by the Linux kernel and an appropriate driver has been loaded.

Remember the logical name, in this case is wlan0.

Now, turn on the WiFi dongle. (Use the logical name obtained from the last command)
# On the beaglebone
sudo ifconfig wlan0 up

Blue LED indicates that the WiFi dongle has been turned ON.

Scan for visible WiFi networks.
# On the beaglebone
sudo iwlist wlan0 scanning
You should see your network in the list:
wlan0     Scan completed :
          Cell 01 - Address: 00:13:49:CA:F5:10
                    Channel:4
                    Frequency:2.427 GHz (Channel 4)
                    Quality=56/70  Signal level=-54 dBm
                    Encryption key:on
                    ESSID:"your-ssid"
                    ...
Now, let's connect to your network.
# On the beaglebone
sudo nano /etc/network/interfaces
Append or modify the file to include the following text (I'm assuming your network it's WEP protected):
auto wlan0
iface wlan0 inet dhcp
    wireless-essid <ssid>
    wireless-key s:<ascii key>
Next, start the connection
# On the beaglebone
sudo ifup wlan0
And finally, test the connection
# On the beaglebone
ping www.google.com

Congratulations, you have connected to a wireless network.

Going automatic


We'll use wpa_supplicant to automate the connections to wireless networks.

wpa_supplicant is a daemon that manages unsecure, WEP and WPA wireless connections.

wpa_supplicant stores the information about the wireless networks that it can connect to in a .conf file, usually named wpa_supplicant.conf.

You can create/edit it, using:
sudo nano /etc/wpa_supplicant/wpa_supplicant.conf
This is how it should look like:
ctrl_interface=/var/run/wpa_supplicant

# Unsecure Network
network={
    ssid="<ssid>"
    key_mgmt=NONE
    priority=<unsecure_priority>
}

# WEP Network
network={
    ssid="<ssid>"
    key_mgmt=NONE
    wep_key0="<key>"
    priority=<wep_priority>
}

# WPA Network
network={
    ssid="<ssid>"
    psk="<passphrase>"
    priority=<wpa_priority>
}

For more examples about the .conf file, check this website.

Let's reconfigure the network interface to add support for wpa_supplicant.
sudo nano /etc/network/interfaces
Change the wlan0 part to match the following text:
auto wlan0
iface wlan0 inet dhcp
    wpa-driver wext
    wpa-conf /etc/wpa_supplicant/wpa_supplicant.conf
Finally reboot the BeagleBone to see the changes.
sudo reboot
Done!

Monday, October 22, 2012

Beaglebone: Installing Ubuntu 12.10

I've got my hands on a Beaglebone, and the first thing I did was installing the latest Ubuntu 12.10 on it. Here how I proceeded.

This post is mainly for self-documenting, feel free to follow my footsteps at your own risk. These steps will probably also work on the Beagleboard.

Back up the original image


The Beaglebone comes with the Linux Ă…ngström distribution. So I backed up the original image, in case something failed. Even if I were to stick with the Ă…ngström distro, it's a good idea to back up the original image.

I removed the microSD that shipped with the Beaglebone, and inserted it into my PC SD slot. Then I checked in which partition it got mounted, using the following command.
df -l
/dev/sda is my PC harddrive, and /dev/sdb is the Beaglebone SD card.

After identifying where the SD was mounted, I used the following command to backup the SD.
dd if=/dev/<sdx> | gzip > /path/to/image.gz
In case I needed to restore the image, I'll have to use the following command:
gzip -dc /path/to/image.gz | dd of=/dev/<sdx>

Installing Ubuntu


I followed the instructions from elinux. These are the summarized steps:
  • Download the minimal Ubuntu 12.10 image
cd ~/Desktop
wget http://rcn-ee.net/deb/rootfs/quantal/ubuntu-12.10-r2-minimal-armhf-2012-11-29.tar.xz
  • Verify the integrity of the image
md5sum ubuntu-12.10-r2-minimal-armhf-2012-11-29.tar.xz
Which should match the following output
b0ee1964a3f8196f4f1a501d1d2ac83a ubuntu-12.10-r2-minimal-armhf-2012-11-29.tar.xz
  • Untar the package
tar xJf ubuntu-12.10-r2-minimal-armhf-2012-11-29.tar.xz
cd ubuntu-12.10-r2-minimal-armhf-2012-11-29
  • Flash the image into your SD
sudo ./setup_sdcard.sh --mmc /dev/<sdx> --uboot bone

Finished flashing the Ubuntu image into the SD card.

For the record (Older releases):

Release 1: http://rcn-ee.net/deb/rootfs/quantal/ubuntu-12.10-r1-minimal-armhf-2012-10-19.tar.xz
MD5: 31be6761a37af98906c5c1e892601e85

Connecting to your Beaglebone


After flashing the Ubuntu image, I removed the SD from my PC and plugged it back into the Beaglebone. I decided to make the first connection using the tty over USB.

After connecting the Beaglebone to my PC using a USB cable, I had to figure out the exact name of the ttyUSBx with the following command.
dmesg | grep ttyUSB
From documentation, ttyUSB0 -> JTAG, ttyUSB1 -> UART (terminal)

I used GNU screen to stablish the connection:
sudo apt-get install screen
screen /dev/<ttyUSBx> 115200
After the connection was established. I saw no output so I pressed the reset button on the Beaglebone.

VoilĂ 

The default login information is below.
  • login: ubuntu
  • password: temppwd

Things to do after installing Ubuntu


OK, I logged in! ... Now what?

Change your password


First thing first, I changed the default password to something stronger
# On the Beaglebone
passwd

Connect the Beaglebone to the internet


I plugged an Ethernet cable into the Beaglebone, and checked if the connection was OK.
# On the Beaglebone
ping www.google.com
I let ping run for a while and then I finished it with Ctrl+C.
Notice the "0% packet lost", that's a Win.

OK I lied, it didn't work the first time, I got 100% packet lost, but resetting the Beaglebone solved the problem.

Autocompletion


Next, I enabled bash completion - a.k.a. the tab autocompletion:
# On the Beaglebone
sudo apt-get update && sudo apt-get install bash-completion

Change the hostname


The terminal prompt says "ubuntu@arm". This means the Beaglebone hostname is "arm". I changed that with the following commands.
# On the Beaglebone
cat /etc/hosts
I got the following output.
# On the Beaglebone
127.0.0.1 localhost
127.0.1.1 arm
So I changed the second line with:
# On the Beaglebone
sudo nano /etc/hosts
# changed the second line from arm to <new-hostname>
Next, I did:
# On the Beaglebone
cat /etc/hostname
And got:
# On the Beaglebone
arm
I changed that with:
# On the Beaglebone
sudo nano /etc/hostname
# changed the hostname from arm to <new-hostname>
Finally I rebooted the Beaglebone to apply the changes.
# On the Beaglebone
sudo reboot

Change your login name


Now the terminal prompt says "ubuntu@beaglebone", the login is "ubuntu". I also changed that.

I had to enable the root account:
# On the Beaglebone
sudo passwd root
# Entered a temporary password
Pressed "Ctrl + D" to logout and I logged as root:

Logging as root.

I changed the old username with:
# On the Beaglebone
usermod -l <new-username> ubuntu
I also added a comment to my new user:
# On the Beaglebone
usermod -c "<full-name-or-comment>" <new-username>
Next, I moved to my new home:
# On the Beaglebone
usermod -md /home/<new-username> <new-username>
Finally, I also renamed the "ubuntu" group to match my new username:
# On the Beaglebone
groupmod -n <new-username> ubuntu
I logged out (Ctrl + D) and logged with my new username:

Logged with my new username.

Finally I locked the root account:
# On the Beaglebone
sudo passwd -l root

Set up a zeroconf hostname


A zeroconf hostname, simplifies SSHing with a local machine by assigning it a hostname on the LAN. This way I don't need to know the IP (which can change over time) to start a SSH session.
#On the Beaglebone
sudo apt-get install avahi-daemon
Now I can connect to the BeagleBone via ssh using the following command:
# On the PC
ssh <beagle-username>@<beagle-hostname>.local

SSHing the Beaglebone


I finished the screen session, using Ctrl+A and then K. I rebooted the Beaglebone, this way the avahi daemon got launched on the next boot.

ssh jorge@beaglebone.local instead of ssh jorge@192.168.1.x

SSH login without password


Everytime I SSH'ed the Beaglebone I needed to input the Beaglebone login and password. The next commands got rid of that.
# On the PC
ssh-keygen # Don't enter a passphrase
ssh-copy-id <beagle-username>@<beagle-hostname>.local

SSH without login

Install GNU screen


I quickly found out that I needed multiple SSH sessions to open multiple terminals on the Beaglebone. Searching for a workaround I found GNU Screen.

With GNU screen I can create multiple "screens", with one terminal inside each of them. All this can be done with keyboard commands.
#On the Beaglebone
sudo apt-get install screen
To start screen I needed to use the following command on every login.
#On the Beaglebone
screen -S 1
This was annoying, so I automated the task:
# On the PC
gedit ~/.bashrc
I appended the following text:
Now with a single command, I can SSH login into the Beaglebone and enter in a running "screen" or create a new "screen", if it doesn't exists.
#On the PC
sshbeaglebone

SSH session with the Beaglebone splitted in 3 using screen.


Other important software


I also installed additional software:
#On the Beaglebone
sudo apt-get install man-db # Manuals
sudo apt-get install vim # Text editor
sudo apt-get install octave # Numerical package
sudo apt-get install build-essential # make, gcc, et al.

What's next?


Acknowledgements


Sunday, October 21, 2012

Ubuntu: How to add Eclipse to the Unity Launcher

A quick how to: Add Eclipse to the Unity Launcher. You can add any other application to the Unity Launcher using these steps.

All the Unity Launchers (e.g. evince, gedit, etc) are implemented as .desktop files. These files are stored in the folder /usr/share/applications/. The .desktop file contains the following information: where the icon is located, where the executable is located, the launcher name, and other secondary information like a comment about the launcher.

Make Eclipse accessible from the command line


All the commands accessible from the command line are stored in a "bin" folder. The folder destined to user binaries is located in /usr/bin.

Let's add the eclipse executable to /usr/bin using the following command.

sudo ln -s /path/to/eclipse/eclipse /usr/bin/

Now eclipse is accessible from the command line as the command eclipse.

Put the icon in the right place


All the icons associated to a Unity Launcher are stored in the /usr/share/pixmap folder. Let's place the eclipse icon in the right folder.

sudo cp /path/to/eclipse/icon.xpm /usr/share/pixmap/eclipse.xpm

Create the .desktop file


Finally, you'll need to create a new .desktop file for Eclipse. Proceed with the following command.

sudo gedit /usr/share/applications/eclipse.desktop

Insert the following text inside this new file.

Note 1: If you didn't add eclipse to /usr/bin, you'll have to use the full path in the Exec section, e.g. Exec=/path/to/eclipse/eclipse

Note 2: If you didn't place the eclipse icon under the /usr/share/pixmap folder, you'll have to use the full path in the Icon section, e.g. Icon=/path/to/eclipse/icon.xpm

This is the result.

Now, Eclipse is accessible from dash and the Unity Launcher.

Saturday, October 6, 2012

How to: OpenCV in Qt creator and ImageQ

In this post I'll cover how to glue the OpenCV libraries to Qt creator via an example. And I'll also release ImageQ, a Qt based image processing application.

OpenCV


OpenCV is an open source library that contains various functions for computer vision and image processing. OpenCV is written in C/C++ but there are ports for Java and Python.

Qt framework


Qt is a framework for cross development of Graphical User Interfaces (GUI) in C++. Qt libraries are open source.

Qt creator is an Integrated Development Environment (IDE) for Qt applications. Qt creator was created using the Qt framework as well.

Dependencies


You'll need the following libraries/software:

  • Qt creator
  • Qt libraries
  • OpenCV libraries

Ubuntu


Open a linux terminal and type the following commands:

sudo apt-get install qtcreator # Qt creator + Qt libraries
sudo apt-get install libopencv-dev # OpenCV libraries

On Ubuntu 12.04 you'll end with Qt libraries version 4.8 and OpenCV libraries version 2.3.

Windows

First, you need Qt creator and Qt libraries. Follow the steps in this post and come back.

Now, grab and unzip OpenCV from here.

Next, install CMake (win32 exe) from here.

You'll need to add C:/mingw/bin to your PATH environment variable. Check this post for a how to.

Now, launch cmake-gui.

Select as source folder: The unzipped version of OpenCV and as build folder: any folder you want. Then click on the configure button, from the drop down menu select the MinGW makefiles and accept. You should get the following output.

OpenCV build configuration.

Go with the default configuration and click the generate button.

Now open a cmd and head to your "build folder" (the one you selected in CMake) and run the following command:

mingw32-make

Now go get a coffee, a sandwich or take a nap while the compiler does it job.

(coffee break)

OK, after thousands of compiler messages, you finally obtained the necessary binaries.

Execute the next command:

mingw32-make install

A new folder name "install" will be created in your "build folder". Copy the contents of this "install" folder in any folder you like (e.g. C:/opencv). You can now delete the "source code folder" (the one you download from OpenCV website) and the intermediate compiled objects (a.k.a. your "build folder").

Now you'll need to modify some environment variables. Check this post if you don't know how.

I'm assuming you are using the C:\opencv folder, change the path if necessary.

Append to the PATH (or Path, is the same, do NOT create a new variable) variable: C:\opencv\bin

Append to the CPLUS_INCLUDE_PATH variable: C:\opencv\include

Append to the LIBRARY_PATH variable: C:\opencv\lib

Setting up the Qt project


(The rest of the article is the same for Ubuntu and Windows users)
  • Launch Qt creator.
  • Start a new project (usually Qt Gui Application).
  • Head to your .pro file.
  • Inside the .pro file add these lines:

Linking OpenCV libraries (Linux)

Note: You probably won't need to link all the libraries, only link the ones you are going to use. The most common libraries are core, highgui and imgproc.

Adding the headers


OpenCV library headers are inside the opencv2 folder. To add these headers to your application add the following line:

Adding OpenCV library headers.

Displaying the images


OpenCV offers a function named cv::imshow for displaying images. However this method won't integrate to your Qt application.

In Qt, images are usually displayed in QLabels using the method setPixmap(). As the name implies the argument for this method must be a QPixmap object. QPixmap objects are optimized for displaying, meanwhile QImage objects are optimized for pixel manipulation. Using the static method QPixmap::fromImage() a QImage can be converted in a QPixmap.

Is easier to convert a cv::Mat, the basic OpenCV image object, to a QImage object than to a QPixmap objetc.

In summary, the necessary steps are listed below:

  • Convert the cv::Mat object to a QImage object.
  • Convert the QImage object to a QPixmap object, using QPixmap::fromImage().
  • Add the QPixmap object to a QLabel, using setPixmap().

To convert a cv::Mat to a QImage, you can use my implementation available on the following links: header and source.

An example


Let's put everything together in an example. Head to your .ui file and add a label (leave the default name "label"), as shown in the following image. (I have also added grid layout, not necessary but helps visualization)

Toy application layout

Next, add the mat2qimage.cpp and mat2qimage.h to your project.

Now, on your mainwindow.cpp source file type the following code:

Toy application source code.

Note: In Windows, I had to use the full path to the image and the '\' characters needed to be written as "\\" insted. Example: "C:\\Users\\Jorge\\Desktop\\myimage.JPG".

This is the output, after running the example:


Toy example output. (Image from wikipedia)

ImageQ


Using these basics, I have developed ImageQ in Qt. ImageQ provides GUI access to some basic OpenCV functions. You can use ImageQ to learn the basics of image processing or to experiment with OpenCV function parameters.

ImageQ: Coin image after Sobel operator.

You can get ImageQ source code from this github repository.

P.S. For ImageQ you'll also need Qwt libraries, you can install these in Ubuntu using the following command. (Windows users, check this post instead)

sudo apt-get install libqwt-dev