First of all, I want to thank the OpenOCD Project for its latest release of OpenOCD. Thanks to this release, its possible to get a working development environment for the STM32F4DISCOVERY relatively fast.
This Development Environment can also be used for other STM32 / Cortex M microcontrollers and development boards. I have tested this Development Environment with the STM32VLDISCOVERY, STM32F4DISCOVERY and F4Dev.
For now this post is Ubuntu specific. Setting the Development Enviroment on other platforms should be fairly similar.
Dependency: GCC
You need a GCC (GNU Compiler Collection) for ARM Cortex processors: You can use the official GCC build (4.6.2) or the Mentor Graphics (former Code Sourcery) GCC build (4.5.2) (Do not use the CodeSourcery GCC, the latest library code requires GCC version 4.6 or later).
I'll cover how to install the official GCC build, since it's a newer version.
Windows
Grab the installer, follow the installation steps, and check the "Add path to environment variable" checkbox just before finishing the installation.
Linux
Grab the Linux installation tarball.
Untar the tarball and that's it, no need to launch a installer.
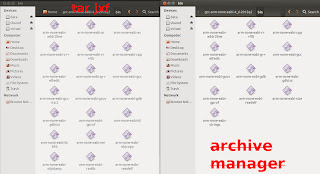
Note: Ubuntu 12.10 users, use the command line tar instead of the GUI archive manager. The latter will result in missing binaries in the bin folder. See image below.


That's it for the GCC dependency.


Grab the zip from here. Unzip the file. Copy the uncompressed folder in your C drive.
Append ";C:\openocd-0.6.1\bin" or ";C:\openocd-0.6.1\bin-x64" to your PATH variable. See this post if you don't know how to edit the PATH environment variable.


** Windows: Edit the (Eclipse > Project > Properties > C/C++ Build > Build command) to "mingw32-make" or whatever make you are using.


And...

Grab the libusb-win32 library. Unzip the downloaded zip archive in your C drive. Enter in the uncompressed folder, then enter into the bin folder and execute the inf-wizard.
Follow the instructions, select the right device ("Single RS232-HS" or similar) from the list. Save the .inf file anywhere and finally select Install Now.
If you are using or planning to use the STM32VLDISCOVERY, then you need these additional steps:
Inside that new file, insert the following text:


NOTE: 84 MHz and latency one SHOULD be equivalent to 42 MHz, since the uC will execute one instruction and wait one cycle before executing the next instruction. However, when you take in consideration that instructions can take more than one cycle (e.g. FPU operations) and program jumps (due to functions and interrupts), calculating the "real" operating frequency gets really hard.
My recommendation: Stick to 42 MHz max with zero latency while developing your application. After everything works fine, try increasing the clock and try different values for the latency until you get something stable. Then check if you are actually getting better performance on the AHB bus peripherals.


Note: Ubuntu 12.10 users, use the command line tar instead of the GUI archive manager. The latter will result in missing binaries in the bin folder. See image below.

Do not use the GUI archive manager
Use the following command instead:
tar jxf gcc-arm-none-eabi-4_6-2012q2-20120614.tar.bz2
Let's add the GCC binaries folder to the PATH environment variable, for easier use.
gedit $HOME/.profile
Append to this file the following lines:
Do a soft reboot to update the PATH variable.
The binaries should be accessible from the command line, let's check.
arm-none-eabi-gcc --version
You should see an output similar to the following lines:
If instead you get the following error and you are using a 64bit Ubuntu/Linux OS:
It means you are missing some 32 bit libraries. The easiest way to solve this is to install all the 32 bit libraries using the following command:
sudo apt-get install ia32-libs
Now test again the arm-none-eabi-gcc command and it should work.
That's it for the GCC dependency.
Dependency: Eclipse CDT
You'll need Eclipse C/C++ Development Tooling.
I recommend using Eclipse Indigo instead of Eclipse Juno, because there
is a bug with the content assist when using namespaces.
Grab the correct package from here. (If you still want to use the Juno version, get the package from here)
Untar / unzip the tarball / zip file, and you are done.
If you don't have Java installed, head to this link. Grab the correct installer (x86 or AMD64), then follow the installation steps.
After installing Java, Eclipse should work.
Windows
If you don't have Java installed, head to this link. Grab the correct installer (x86 or AMD64), then follow the installation steps.
After installing Java, Eclipse should work.
Dependency: GNU ARM Plugin
With this plugin, Eclipse will be able to detect the ARM GCC.
In Eclipse, go to (Help > Install New Software).
On this new window, click the add button, and insert the following text.
http://gnuarmeclipse.sourceforge.net/updates

Click OK and a component named "CDT GNU Cross Development Tools" will appear, check it, then click the Next button and following the installation instructions.

You'll be prompted to reset Eclipse, do so.
You're done with this plugin.
Dependency: Zylin Embedded CDT Plugin
This plugin is necessary to flash and debug within Eclipse.
In Eclipse, go to (Help > Install New Software).
On this new window, click the add button, and insert the following text.
http://opensource.zylin.com/zylincdt

Click OK and a component named "Zylin Embedded CDT" will appear, check it, then click the Next button and following the installation instructions.

You'll be prompted to reset Eclipse, do so.
You're done with this plugin.
Dependency: OpenOCD
With this software, your PC will be able to flash and debug STM32 targets via a USB <-> JTAG interface.
Windows
Grab the zip from here. Unzip the file. Copy the uncompressed folder in your C drive.
Append ";C:\openocd-0.6.1\bin" or ";C:\openocd-0.6.1\bin-x64" to your PATH variable. See this post if you don't know how to edit the PATH environment variable.
Linux
Grab the version 0.6.0 tarball from here.
Untar the tarball.
Use the following installation commands:
sudo apt-get install libftdi-dev
cd <path to the untared openocd tarball>
./configure --enable-ft2232_libftdi --enable-stlink
make
sudo make install
cd <path to the untared openocd tarball>
./configure --enable-ft2232_libftdi --enable-stlink
make
sudo make install
You're done with the OpenOCD installation.
If you don't have Git installed. Grab the installer from here. Follow the installations steps, but choose the "Run Git from the Windows Command Prompt" instead of the default option.
Windows doesn't come with a "make" tool by default. The easiest way to get "make" is downloading this MinGW (**). Then unzip the downloaded zip archive in your C drive.
(**) The trolltech ftp server has been shutdown, luckily ShaoLin has posted a mirror on his Google Drive, check his post for information on how to download MinGW.
And append ";C:\mingw\bin" to your PATH variable. See this post if you don't know how to edit the PATH environment variable.
Git (Windows)
If you don't have Git installed. Grab the installer from here. Follow the installations steps, but choose the "Run Git from the Windows Command Prompt" instead of the default option.
Make (Windows)
Windows doesn't come with a "make" tool by default. The easiest way to get "make" is downloading this MinGW (**). Then unzip the downloaded zip archive in your C drive.
(**) The trolltech ftp server has been shutdown, luckily ShaoLin has posted a mirror on his Google Drive, check his post for information on how to download MinGW.
And append ";C:\mingw\bin" to your PATH variable. See this post if you don't know how to edit the PATH environment variable.
The Eclipse Project Template
Grab the Eclipse project template I have developed: bareCortexM
cd # choose some directory
git clone https://github.com/JorgeAparicio/bareCortexM.git
git clone https://github.com/JorgeAparicio/bareCortexM.git
Importing the Eclipse Project
In Eclipse, go to (File > Import).
In this window, select (General > Existing Project into Workspace).
In this new window, click the Browse button next to the "Select root directory" box and select the bareCortexM folder.

In this project, go to the "src" folder and open the "main.cpp" file. You should see a single function named int main().
From the Eclipse menu select (Project > Properties).
In this windows, select the C/C++ Build.
Click the Manage Configuration button next to the Configuration combo box.
Select your platform and click the Set Active button. (By default the Linux platform is selected).

** Windows: Edit the (Eclipse > Project > Properties > C/C++ Build > Build command) to "mingw32-make" or whatever make you are using.
Now try building the project, if you correctly followed the previous steps the build should be successful.

Configuring the project for your target
Before flashing your target (in this case the STM32F4DISCOVERY) it's necessary to configure the project for your specific target.
Linker Script selection
The linker script contains the memory map of your target device.
In the Eclipse menu, go to (Project > Properties).
Now select C/C++ (Build > Settings).
Select (ARM Sourcery GCC C++ Linker > General).
Modify the file in the Script File text box, to match your target device.

You can see the list of supported devices in the linker folder.

OpenOCD interface/target configuration
You'll need to tell OpenOCD which interface and target you plan to use.
In the Eclipse menu, (Run > External Tools > External Tool Configurations).
In this new window, select (Program > OpenOCD).
On the Main tab, make sure the OpenOCD location is correct. Then modify the arguments as necessary.

The first argument to modify is the interface: "-f openocd/interface/<your interface>.cfg". You can see the list of supported interfaces in the (openocd > interface) folder.

The second argument to modify is the target: "-f openocd/target/<your target>.cfg". You can see the list of supported targets in the (openocd > target) folder.

GDB script selection
The GDB script contains the flash and debug information.
In the Eclipse menu, go to (Run > Debug Configurations).
In this new window, select (Zylin Embedded debug (Native) > Flash and Debug).
On the Debugger tab, you'll need to select an appropriate GDB script in the GDB command file text box.

You can see the list of supported devices in the gdb folder.

Configuration table
| Board | Linker Script (.ld) |
Interface (.cfg) |
Target (.cfg) |
GDB Script (.script) |
|---|---|---|---|---|
| STM32VLDISCOVERY⁽¹⁾ | stm32f100rb | stlink-v1 | stm32f1x_stlink | stm32vldiscovery |
| STM32F4DISCOVERY | stm32f407vg | stlink-v2 | stm32f4x_stlink | stm32f407vg⁽²⁾ |
| F4Dev | stm32f407ve | ujtag | stm32f4x | stm32f407ve⁽²⁾ |
⁽¹⁾: Flash protection must be disabled (probably using other JTAG dongle) before using this configuration.
⁽²⁾: You can use other scripts like: stm32f4_16kb, stm32f4_32kb, etc. for faster flashing.
The first program
Let's flash your first program into the STM32F4DISCOVERY.
Copy the following code in the main.cpp source file.
Build the program, and then click the OpenOCD action in the External Tool menu (The green play + red toolbox icon) or go to (Menu > Run > External Tools > OpenOCD).
And...

What the...?
If you are a Linux user, you'll probably bump into that error. You'll need to give permission to your interface device, this way a non-rooted Eclipse will be able to flash and debug the target device.
USB Permissions/Drivers
Windows (for FTDI devices)
Grab the libusb-win32 library. Unzip the downloaded zip archive in your C drive. Enter in the uncompressed folder, then enter into the bin folder and execute the inf-wizard.
Follow the instructions, select the right device ("Single RS232-HS" or similar) from the list. Save the .inf file anywhere and finally select Install Now.
Linux
To grant permission to your interface device you'll have create a file using the following command.
gksudo gedit /etc/udev/rules.d/33-openocd.rules
(You can choose any other number, instead of 33)
In this new file you'll need to add the following text:
This will give permission to all the FTDI based JTAG-dongles and to the ST-LINK v2 JTAG interface present in the STM32F4DISCOVERY.
If you are using or planning to use the STM32VLDISCOVERY, then you need these additional steps:
gksudo gedit /etc/modprobe.d/stlink_v1.conf
Inside that new file, insert the following text:
NOTE: Currently, ST-LINK v1 via OpenOCD can't modify the target device flash protection. This means, that if your STM32VLDISCOVERY has its flash protection enabled, you won't be able to flash it. On the other hand, if you manage to disable the flash protection using other JTAG dongle, then you'll be able to use the ST-LINK v1 connection. OpenOCD will probably provide better support for ST-LINK v1 in the future.
A reboot is necessary to update the last changes.
A reboot is necessary to update the last changes.
After that, the permission problem should be fixed.
Back to the first program
As before, launch OpenOCD. You should get the following output this time.

That X breakpoints and Y watchpoints is the equivalent of success. Now that you have established a link between your PC and the microcontroller, you can begin the flash and debug session.
Click the Flash and Debug action in the Debug menu (the green bug icon). The flashing process will start, and it will take a while... around 20s (if you using a device with big flash memory, otherwise it's faster).
NOTE: Actually flashing your program is quite fast, since is probably around 200-300 bytes, what takes so much time is erasing the old memory. The whole flash memory get erased before writing the new program. You can achieve faster flashing times if you only "use" a fraction of the memory, when using scripts like stm32f4_16kb, stm32f4_32kb, etc.
After the flashing is over, you'll go into the debug session. You'll be prompted if you want to change to the Debug perspective, answer yes.
Debugging 101
Let's do some debugging now. First, let's examine this new perspective.

In the top left window, you'll see Debug window. Inside this window you'll see Thread 1, this is the program that's currently running, notice that it says suspended, this means that the ARM core is halted. Also, below Thread 1 you can see the stack of functions called, right now it says the program is at 0x00000000, this is because the JTAG interface hasn't asked for information yet.
Also in the debug window you can see some buttons, that I have labelled from 1 to 7. Now I'll cover what they do:
| N | Button | Description |
|---|---|---|
| 1 | Resume (F8) | Leaves the suspended status. |
| 2 | Suspend | Halts the program execution. |
| 3 | Terminate (Ctrl + F2) | Finishes the program. |
| 4 | Step into (F5) | Goes (if possible) into the current subroutine. |
| 5 | Step over (F6) | Executes the current line of code and moves onto the next. |
| 6 | Step return (F7) | Leaves the current subroutine. |
| 7 | Instruction Stepping Mode | Enables/disables the instruction stepping mode. (Disabled by default) |
Ok, now hit the Resume button and then click the Suspend button. You'll end in a state similar to the following image.

You can see that the middle left window changed, and now is showing the main.cpp file. Also, there is a highlighted line, this is where the halted program currently is. You can also see the disassembly of the current program in the middle right window, if you can't, then you can enable the disassembly from (Menu > Window > Show View > Disassembly).
NOTE: Read this note if your program ends in the defaultExceptionHandler() function instead.
This is a common error (bug?) that appears when you are using ST-LINK
connections (in the STM32VLDISCOVERY or STM32F4DISCOVERY). In this case, terminate (red square button) the debug session and the OpenOCD connection. And then do the build > launch OpenOCD > start debug session process again.
Let's watch some variables now, select the Variables tab of the top right window and right click the empty space, then click on Add Global Variables.

Check the foo variable and then click OK. You can now watch the value of foo. Try resuming the program for a while and then suspend it again. You should see a noticeable increment in the value of foo.

Now, let's see how breakpoints work. Right click the line 27 (it doesn't matter if you can't see the line number) and select Toggle Breakpoint. Now hit the Resume button.

The program will stop as soon as it reaches the breakpoint, you'll notice that foo's value increased in one.
Let's terminate the program (Flash and Debug) and then terminate the OpenOCD session and jump into something more interesting.
Blinking a LED
bareCortexM is a barebone project template, you'll need a peripheral library to do more than just numerical operations. This is where libstm32pp comes in.
Adding the libstm32pp library to the project
Let's place the libstm32pp project inside the bareCortexM project.
cd <path to bareCortexM>
git clone https://github.com/JorgeAparicio/libstm32pp.git
git clone https://github.com/JorgeAparicio/libstm32pp.git
Go back to eclipse, and right click the project name (bareCortexM) and select the Refresh action. You should see the libstm32pp folder inside the project.

Now, you'll need to add the library to the include path.
In Eclipse menu, go to (Project > Properties).
Go to (C/C++ General > Paths and Symbol).
In the Includes tab, select the GNU C++ in languages and then click the Add button.
In this new window, click the Workspace button and select the (libstm32pp > include) folder.

Configuring the library
You'll need to configure the library to match your target, head to the (libstm32pp > include) folder and open the device_select.hpp. There you can select your target's family by commenting and uncommenting the defines in that file.

Using the library
Go into the (libstm32pp > demo) folder and open the gpio_pin.hpp file. Copy the content to your main.cpp file. You can change the LED pin from PA0 to any other pin you wish. For the STM32F4DISCOVERY you can select PD12, PD13, PD14 or PD15 to use the user LEDs available in the board. For the STM32VLDISCOVERY use the PC8 and PC9 instead.
After that, build, launch OpenOCD and start the debugging session.


Configuring the Clock
If you want to configure your device clock head to the (libstm32pp
> include) folder and open the clock.hpp file. As in device_select.hpp, by
commenting / uncommenting defines you can configure the clock to fit
your needs.

The clock will be configured when you call the function clk::initialize(). You should call this function as earlier as possible in your main function. If you are using any of the external crystals/oscillators (HSE or LSE) then you'll need to define the functions: clk::hseFailureHandler and clk::lseFailureHandler. These functions will be called in case the external oscillators doesn't stabilize in some time as dictated by HSE_TIMEOUT and LSE_TIMEOUT.

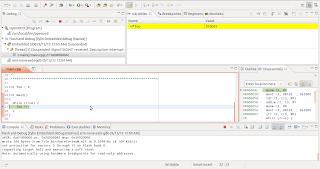
The STM32 microcontrollers use various buses (AHB, APB) to move data between the processor and the peripherals. These buses define the operating frequency of various peripherals and these buses can be clocked at different frequencies. All this configuration is carried in the clock.hpp file, you can check the final frequencies using the cPrint statement:

The cPrints statement prints its argument as an error. In the above image I used the cPrint statement to print the value of clk::AHB which the working AHB frequency. You can use cPrint to print other compile time known values, as cPrint creates an error, be sure to remove it or comment it after using it.
NOTE: As far as I know, the STM32F4 devices from the revision "A" can't use the ART accelerator (see the errata sheet here), for these devices the LATENCY parameter is important when configuring the clock. From my observations the following latencies work well:
| Clock Frequency (AHB) | LATENCY | Comment |
|---|---|---|
| Up to 42 MHz | Zero | Solid Rock Stable. |
| From 42 Mhz to 84 MHz | One | Seems stable. |
| 168 MHz | Three | Some WTFs when using interrupts and enabling optimization. |
NOTE: 84 MHz and latency one SHOULD be equivalent to 42 MHz, since the uC will execute one instruction and wait one cycle before executing the next instruction. However, when you take in consideration that instructions can take more than one cycle (e.g. FPU operations) and program jumps (due to functions and interrupts), calculating the "real" operating frequency gets really hard.
My recommendation: Stick to 42 MHz max with zero latency while developing your application. After everything works fine, try increasing the clock and try different values for the latency until you get something stable. Then check if you are actually getting better performance on the AHB bus peripherals.
Handling interrupts
The most important feature in every microcontroller are the interrupts. With these interrupts the microcontroller can handle various internal/external events as they come by.
To enable interrupts you'll need to map the interrupt handlers in memory. I've already done this job, so you only need to include "interrupt_cpp.hpp" file in the "interrupts.cpp" source file (this is in the src folder).

Let's try a demo now, go to the (libstm32pp > demo) folder and open the tim_blink_led.hpp file, or if you are using a STM32F4DISCOVERY go to (libstm32pp > demo > f4discovery) folder and open the led_wheel.hpp file. Copy the content of the file to main.cpp.
In the tim_blink_led demo you might want to change the LED from PA0 to some other pin. In either demo you can change the LED blink frequency by changing the configurePeriodicInterrupt function argument.
Build, launch OpenOCD and start the debugging session.

LED Wheel demo @ 16Hz
New, delete and printf
Since you're developing in C++, it's possible to use the operators new, delete and input/output functions like printf. You can also use the cout function, but it takes too much flash memory, so I'll recommend using printf instead.
To enable these functions, you'll need to define the system calls. The system calls are hardware dependant standard functions like read, write, close, start, exit, sbrk, etc. libstm32pp provides a minimal implementation, which is enough to use the new, delete and printf functions.
To enable the system calls, you'll need to include the "system_call_cpp.hpp" file in the "system_call.cpp" source file (located in the src folder).

Also you'll need to enable the startup libraries.
In Eclipse, go to (Menu > Project > Properties).
Go to (C/C++ Build > Settings).
In the Tool Settings tab, go to (ARM Sourcery GCC C++ Linker > General).
Uncheck the "No startup or default libraries".

new demo
Let's do a quick demo about the new operator. Write in your main.cpp source file the following code:
Build, run OpenOCD and start a debugging session as usual.

The first thing you'll notice is that this small program takes around 90KB of flash. That's the price to pay for using dynamically allocated memory. If you watch the foo variable after running the program for some time, you'll notice that the pointer has a value around 0x20000000, this is the address that the new operator assigned it and also you can see the value stored in that address, which would be the first element of the array.
printf demo
There is a printf demo in the (libstm32pp > demo) folder. You can use printf with any of the 6 UART modules, which needs to be specified in the system_call.hpp file (this is in the (libstm32pp > include) folder). You'll also need a USB <-> UART converter to get the UART output into your PC. In your PC, you'll need a serial port terminal emulator like minicom or qSerialTerm.
Optimization
Finally, let's cover how to do optimization.
In eclipse, go to (Menu > Project > Properties).
Go to (C/C++ Build > Settings).
In the Tool Settings tab, go to (ARM GCC C++ Compiler > Optimization).
Select in the Optimization Level, the option that fits your need.

My recommendation: When developing an application, I recommend working with the optimization turned off and turning it on after you have finished developing. This is because the optimization will complicate the debugging process, as the compiler will optimize out some variables and also some breakpoints might misbehave.
Feedback is welcome
There are many other demos inside the (libstm32pp > demo) folder. Please check them and inform me if you find any bug. I'll appreciate your feedback. Thanks.
It is not working at all.
ReplyDeleteWhen I try to Debug it is sending the output:
source gdb/stm32f4_1024kb.script
gdb/stm32f4_1024kb.script:25: Error in sourced command file:
localhost:3333: \320\222\321\200\320\265\320\274\321\217 \320\276\320\266\320\270\320\264\320\260\320\275\320\270\321\217 \321\201\320\276\320\265\320\264\320\270\320\275\320\265\320\275\320\270\321\217 \320\270\321\201\321\202\320\265\320\272\320\273\320\276.
Hello Daniil,
DeleteI managed to reproduce your error.
You need to launch OpenOCD BEFORE launching the Debug Session:
1.- Menu > Run > External Tools > OpenOCD.
After that you should see the message:
"Info : stm32f4x.cpu: hardware has 6 breakpoints, 4 watchpoints"
If you DON'T see that message, then probably there is an error with your OpenOCD setup.
In case you don't see that message, please post here the following information:
+ Which OS are you using?
+ Which board, device, JTAG interface are you using?
+ Open your command line and try the command "openocd". What is the output?
+ Check the OpenOCD location in (Menu > External Tools > External Tools Configuration) -> (Program > OpenOCD) -> (Main tab). By default, it says "/usr/local/bin/openocd", does it match your installation path?
----------
2.- If OpenODC succeeds, then launch the debug session.
You should see:
"wrote # bytes from file bin/bareCortexM.elf in #s (# KiB/s)
set protection for sectors 0 through # on flash bank 0
requesting target halt and executing a soft reset"
1) My OS is Kubuntu 12.04.
Delete2) My device(target) is STM32F4Discovery
3) My interface is unknown. I just used internal debugger.
4) My openocd writes following:
$ openocd
Open On-Chip Debugger 0.6.0 (2012-09-24-14:33)
Licensed under GNU GPL v2
For bug reports, read
http://openocd.sourceforge.net/doc/doxygen/bugs.html
Runtime Error: embedded:startup.tcl:47: Can't find openocd.cfg
in procedure 'script'
at file "embedded:startup.tcl", line 47
Error: Debug Adapter has to be specified, see "interface" command
in procedure 'init'
Seems like an error. Where are this config files have to be and what I have to write to it?
5) OpenOCD install directory is /usr/local/bin/openocd - something I can do right :)
6) If I want to FLESH AND DEBUG it outputs this:
source gdb/stm32f4_1024kb.script
0x00000000 in ?? ()
target was in unknown state when halt was requested
target state: halted
target halted due to debug-request, current mode: Thread
xPSR: 0x61000000 pc: 0x08000204 msp: 0x200007e4
background polling: on
TAP: stm32f4x.cpu (enabled)
target state: halted
target halted due to debug-request, current mode: Thread
xPSR: 0x61000000 pc: 0x08000204 msp: 0x200007e4
stm32f4x errata detected - fixing incorrect MCU_IDCODE
device id = 0x10006413
flash size = 1024kbytes
flash 'stm32f2x' found at 0x08000000
cleared protection for sectors 0 through 11 on flash bank 0
target state: halted
target halted due to debug-request, current mode: Thread
xPSR: 0x01000000 pc: 0x08000188 msp: 0x200007fc
erased sectors 0 through 11 on flash bank 0 in 16.322474s
target state: halted
target halted due to breakpoint, current mode: Thread
xPSR: 0x61000000 pc: 0x20000042 msp: 0x200007fc
wrote 244 bytes from file bin/bareCortexM.elf in 0.028836s (8.263 KiB/s)
set protection for sectors 0 through 11 on flash bank 0
requesting target halt and executing a soft reset
The last message may be bound with memory map. The same shit with the IAR workbench under Windows.
DeleteThanks for your help.
4) That's normal. I get the same in my command line. Normally, you need to launch OpenOCD with "-f" arguments. This has been already taken care of in (Eclipse > Run > External Tools > External Tool Configurations) -> (Program > OpenOCD) -> (Main tab) -> Arguments. You already configured those arguments.
Delete6) That output looks fine. If you are not hitting the main function after that. Then just terminate the debug session and OpenOCD, and then launch them again (OpenOCD and then Debug). You should get to the main function in the second try. This issue happens on the DISCOVERY boards, my custom hardware works fine on the first try.
I guess there are no more issues?
Definitely imagine that which you said. Your
Deletefavourite justification seemed to be at the internet the easiest factor to be
aware of. I say to you, I certainly get annoyed at the same time
as other folks consider concerns that they just don’t realize about.
You managed to hit the nail upon the highest as well as
defined out the entire thing without having side effect , people could
take a signal. Will probably be again to get more. Thanks
Embedded Programmer: Stm32F4Discovery Development With Gcc In Eclipse >>>>> Download Now
Delete>>>>> Download Full
Embedded Programmer: Stm32F4Discovery Development With Gcc In Eclipse >>>>> Download LINK
>>>>> Download Now
Embedded Programmer: Stm32F4Discovery Development With Gcc In Eclipse >>>>> Download Full
>>>>> Download LINK zv
This is a great sharing. Thank you so much.
ReplyDeleteI do have some questions and comments want to bring. I think it will be better to bring one question/comment each a time. So here is the first one.
How I can create/configure a project for STM32F4Discovery in Eclipse from scratch? Could you provide the procedure?
I had successfully imported your project of bareCortexM, build/debug all fine. However, when I try to tweak around, I got build failed.
What I did the change is on Project->Properties, C/C++ Build=> Tool Chain Editor : Current toolchain changed to ARM Linux GCC(GNUARM), then I get build fail. The error message says, " No tool found that can build the extension specified with the build artifact name all". By looking the Makefile, I understand how the problem comes. However, the Makefile is been generated instead of been created manually, so what I should to do in Eclipse to generate the rule in Makefile to generate the elf file? And I noticed that the example project really use GNUARM toolchain instead of Sourcery G++ Lite. The interesting is, even I change the ToolChain setting in Eclipse back to Sourcery G++ Lite, the build keep fail the same way. How this could be?
Hello Norm,
DeleteI don't quite understand what you want to do. Whether you use CodeSourcery GCC version or the official GCC version, the configuration is the same. The current configuration looks for binaries prefixed with arm-none-eabi, and both GCC versions have the correct binary names. (Just don't forget to correctly set the PATH variable)
Regarding the build errors, I can't help you if you don't provide me details about the errors. Also, the current configuration does generates an ELF file and places it in the "bin" folder.
If you want to create a project from scratch, check this post, it covers some of the details behind bareCortexM.
Regards,
OK, let me clarify.
DeleteFirst, I had followed exact your instructions to install/setup the development tools, which using official GCC from ARM from launchpad. The example project build/debug all fine.
However, in on Project->Properties, C/C++ Build=> Tool Chain Editor : Current toolchain was selected as "ARM Linux GCC(Sourcery G++ Lite)", and there are other options from the pull down menu such as "ARM Linux GCC(devkitPro)", "ARM Linux GCC(GNUARM)" ,"ARM Linux GCC(Summon)" etc. I thought the option of "ARM Linux GCC(GNUARM)" should be exact match the real toolchain used in the example project, so I did experimental change to select "ARM Linux GCC(GNUARM)" over than "ARM Linux GCC(Sourcery G++ Lite)". Surprisingly, this causes build fail, the error message says
>>>>>>>>>>>>>>>>>>>>>>
**** Build of configuration Linux for project bareCortexM ****
make all
make: *** No rule to make target `bareCortexM.elf', needed by `all'. Stop.
**** Build Finished ****
<<<<<<<<<<<<<<<<<<<<<<<<<<<
Any idea what's wrong?
Thanks for your time.
This comment has been removed by the author.
Deletetl; dr: It doesn't work because your GCC tools are named arm-none-eabi-g++, arm-none-gcc, etc and NOT named arm-elf-g++, arm-elf-gcc, etc.
DeleteThere are many things going around here:
+ The ARM Embedded GCC toolchain, i.e. the one used in this tutorial, is NOT the same that the GNUARM toolchain. The latter is an old toolchain, that hasn't been updated in a long time (I think it hasn't been updated since 2006).
+ The GNU ARM Eclipse plugin (yes, it's related to the GNU ARM toolchain, but they are different) is in charge of generating the makefile.
+ The GNUARM plugin creates the makefile according to the toolchain selected in C/C++ Build -> Tool Chain Editor:
- If the GNUARM toolchain is selected, the makefile will use the tools prefixed with arm-elf, i.e. arm-elf-g++, arm-elf-gcc, etc.
(You can check this under C/C++ Build -> Setting => Tool Settings => ARM GCC C Compiler => Command)
- If the CodeSourcery toolchain is selected, the makefile will use the tools prefixed with arm-none-eabi. Which matches the binaries inside your folder "gcc-arm-none-eabi-4_6-xyz/bin" or "codesourcery/bin".
+ All boils down to how your GCC tools are named. In theory, you could select the GNUARM toolchain and rename your ARM Embedded GCC tools from arm-none-eabi to arm-elf and the project will build fine. But, selecting the CodeSoucery toolchain will also work and it's far easier.
I hope it's clearer now...
P.S. I deleted your makefile dump because everyone else can generate it using the project template.
P.P.S. I still don't understand why you changed the toolchain... Either (a) you haven't heard of "If it ain't broke, don't fix it" or (b) you plan to use a different device, in this case you should be looking at: (1)the linker script (.ld file), (2) the startup script (startup.cpp/h), (3) the openocd .cfg files and (4) the gdb .script files.
Thanks for help.
DeleteIt is surprisingly that even I configure the toolchain setting back to Sourcery Lite, and did set the linker script file, the generated makefile remains in the wrong condition, which makes the build fail.
I figured out the procedure to create an eclipse project from a scratch for stm32f4discovery, by the referring http://gnuarmeclipse.livius.net/wiki/Create_and_build_a_new_project
. In general it works fine.
It somewhat confuses me is, if I choose toolchain in eclipse to "ARM Linu GCC(Summon)", and then setting the linker file the same way, the build fails on the " make: *** No rule to make target `scratchStm32f4DiscoveryGnuTools4Arm.elf', needed by `all'. Stop. ". After then, even I change the toolchain setting in eclipse back to "ARM Linu GCC(Sourcery G++)" , and set properly the linker file, the build never come to be success anymore.
Any idea how the makefile to be generated from eclipse plug-in? I was interested to look into the procedure.
There is a bug with the CDT + GNUARM Eclipse plugin setup (I don't which one is at fault). It's documented here (http://sourceforge.net/tracker/index.php?func=detail&aid=3027456&group_id=181918&atid=899126).
DeleteThe bug states that building the project fails when you switch the toolchain. As you already noticed, the build fails due to a malformed makefile.
The workaround is to create a new project with the correct toolchain, and then copy the .cproject from the new project into the faulty project. After that you might need to (a) clean the project and then (b) head to C/C++ Build -> Discovery Options and click the clear button.
In my honest opinion, it's best to avoid the problem by choosing the correct toolchain when you create the project.
Both the CDT plugin and the GNUARM plugin generate the makefile. If you want to learn how it's implemented, you should check their respective source code, which is written in Java.
Thank you very much.
DeleteAs I did google around, I noticed this is a eclipse or eclipse plug-in bug, the same as you pointed out.
Thanks for the work around.
I'm not a java guy, so I don't think I will do anything further to this issue.
Again, thanks for your information.
All right, here to start another topic, startup code.
ReplyDeleteTraditionally, we need to implement startup code by assembly code, to prepare that some called "the C running environment".
In your example source code, I saw you come up the startup with C function in startup.cpp. It seems work fine. I thought this will be great for beginner to understand and start embedded software project.
I'm be curious that what is the disadvantage to compare with startup code by assembly?
Neither my startup code nor the startup code in the ARM Embedded GCC readme.txt implement the "C runtime environment". These startup routines only load/erase the RAM memory and map the interrupts/exceptions.
DeleteThe C runtime libraries are linked by the GCC tools at compile time. You usually only disable/enable these libraries in C/C++ Build -> Settings => Tool Settings => GCC C++ Linker -> General => nostdlibs, nodefaultlibs. And sometimes you may want to (re)implement the C runtime system calls, i.e. read, write, sbrk, open, etc.
The advantages/disadvantages of writing the startup code in C/C++ vs writing it in assembly are the same advantages/disadvantages of writing any other program in C/C++ vs writing it in assembly.
Note that the traditional startup.s implements BOTH the RAM memory loading/erasing and the interrupt/exception mapping. In my bareCortexM project, I have implemented the RAM part in startup.cpp/h and implemented the exception mapping in exception.cpp/h.
Since the interrupts are device specific, that mapping is not implement in bareCortexM. For the stm32 devices, I have implement the interrupt mapping in the libstm32pp library.
I realized the naming of "C runtime environment" sounds confusing. Where I don't mean the C run-time Library environment, which prepare such as standard I/O etc.. What I do mean is to setup main stack pointer, prepare the initialized global variables by copying over the data from ROM to RAM, zeroed out the implicitly or explicitly global or static data with zero initial value.
ReplyDeleteAnyway, what my concern here is, what the reason makes you to choose a C style startup coding instead of an CMSIS compliance assembly coding? I understand this can be considered to be personal choice, but I do believe CMSIS compliance startup code would provide many benefits.
One word: DRY (Don't Repeat Yourself), OK maybe it's not one word.
DeleteI've seen many startup scripts and the problem is that there many startup scripts, one for each device/family. All of these scripts REPEATED the same parts: Exception mapping and RAM handling, but they differ in the Interrupt mapping, which is device specific.
So I created the startup.h/cpp and the exception.h/cpp to handle this repetition for every Cortex-M device. And for the dozens of STM32 devices, I created a similiar interrupt.h/hpp pair (in libstm32pp) which handles the device specificness via the C preprocessor (#define, #ifdef, etc).
Other than that, yeah it's a personal choice :-)
Hello Jorge,
ReplyDeletethis is what I get when I run OpenOCD:
Open On-Chip Debugger 0.6.1 (2012-10-22-23:30)
Licensed under GNU GPL v2
For bug reports, read
http://openocd.sourceforge.net/doc/doxygen/bugs.html
adapter speed: 1000 kHz
Info : clock speed 1000 kHz
in procedure 'transport'
in procedure 'init'
could you help me, please?
Hi, this more like the issue of USB access permission. Did you followed the procedure to give yourself permission by adding file in /etc/udev/rules.d/ ?
DeleteHi Norm,
Deleteyes I did, but nothing happens...I really don't know what is going on :(
Well, that's weird. Make sure you are belong to the group, in which given permission in file under /etc/udev/rules.d/ . And try after reboot system?
DeleteHello Marco,
DeleteI'm assuming you are using the STM32F4DISCOVERY. Please check that the CN3 jumpers are "ON" in the board, see the section 4.2.1 of the user manual (UM1472).
If the jumpers were "OFF", then that probably was the issue. If still doesn't work execute the following commands in your terminal:
cd /path/to/bareCortexM
cd openocd
openocd -f interface/stlink-v2.cfg -f target/stm32f4x_stlink.cfg
If it works, i.e. you see 6 breakpoints and 4 watchpoints, then you were missing the configuration in (Eclipse => Run -> External Tools -> External Tools Configuration) - check the blog post.
If still doesn't works, execute the next command - make sure the terminal is still at the directory /path/to/bareCortexM/openocd:
logsave log.txt openocd -f interface/stlink-v2.cfg -f target/stm32f4x_stlink.cfg
Send me the file log.txt located at /path/to/bareCortexM/openocd via email, so I can look into the problem.
Sorry, there is a typo in the last command - I'm missing a "-d":
Deletelogsave log.txt openocd -d -f interface/stlink-v2.cfg -f target/stm32f4x_stlink.cfg
Thanks Jorge and Norm,
DeleteI have just to add myself to the udev rules (OWNER="myself"), disconnect the STM32F4 Discovery and connect it again and now is working!!!
Thanks for this amazing tutorial Jorge.
Hello everybody.. I am trying to start using the platform and this is the best, and most directly, tutorial I had finded so far. However, maybe as I am trying to use all the described procedures in Windows environment, I was not able to compile the code when I try to use something from the libstm32pp, probably because of some metaprograming resource that the compiler doesn't expect (I am using the Code Sourcery one), and when I try to compile the Blink Led example, the folowing message is shown by Eclipse:
ReplyDeleteIn file included from ../src/main.cpp:24:0:
C:\Users\-\Documents\Estudo_Cortex\STM32\JorgeAparicio-bareCortexM\libstm32pp\include/peripheral/gpio.hpp:121:11: error: a function call cannot appear in a constant-expression
C:\Users\-\Documents\Estudo_Cortex\STM32\JorgeAparicio-bareCortexM\libstm32pp\include/peripheral/gpio.hpp:125:11: error: a function call cannot appear in a constant-expression
src/subdir.mk:30: recipe for target `src/main.o' failed
make: *** [src/main.o] Error 1
**** Build Finished ****
When I try to find out what would be wrong, I saw a 'syntax error' indication on bitband.hpp file, which is called by gpio.hpp file, idicated on the error message above.
I'd appreciate any help on this problem, thanks a lot..
Hello NOliveira,
DeleteThis is because the CodeSourcery GCC implements an older GCC version, and doesn't support the "constexpr" feature.
Please use the GCC ARM Embedded isntead (https://launchpad.net/gcc-arm-embedded), there is a Windows installer available in the right panel of the website.
I'll update the Sourcery issue from this post.
Thanks!
Thank you very much for the answer Jorge, but I am still on the same point, I realized that my version of GCC was out of date, however, even after I downloaded the official GNU ARM Tool, I don`t know how to setup the resource on eclipse environment, once I don`t remember doing anything when I installed the CodeSourcery tool (maybe only configured the path variable). So, is there any tutorial or tips you would sugest me to follow or read about to make the new compiller operational through Eclipse.
DeleteMaybe a wrong, but efective way would be replace all content from the sourcery folder with the content of GNU Tools ARM Embedded folder? Anyway, still searching.. (or maybe I should give up on Windows at all :)
These things come to my mind.
Delete+ Probably you don't have the correct binaries added to the PATH variable. Check using this command in the command line:
arm-none-eabi-gcc --version
If the output says version 4.5.x and CodeSourcery or not recognized command. Then this is the problem.
To fix this, uninstall both CodeSourcery and the official GCC. Afterwards, install only the offical GCC and just before exiting the installer select the option "Add to PATH environment variable" (or something like that).
Using the "arm-none-eabi-gcc --version" command again, should output 4.6.2.
+ If you have the correct version, then make sure you select the correct configuration "Windows" instead of "Linux" (see post above).
+ If still doesn't work then delete the project and clone it again from the repository, because the old project might have become "attached" to the CodeSourcery GCC. (this is a bug, see my comment here from October 21).
+ If you still have problems, please post here the compiler/Eclipse errors.
Hi Jorge, thanks for this tutorial.
DeleteI'm having this problem when trying to build the bareCortex project:
cc1plus.exe: error: unrecognized command line option '-std=gnu++11'
mingw32-make: *** [src/exception.o] Error 1
src/subdir.mk:30: recipe for target 'src/exception.o' failed
I'm working under windows 8.
I see that the error is the option -std=gnu++11, but how can i fix this?
That line is in the subdir.mk file, and i can't really change it since its reloaded everytime I try to build it.
Maybe it is because Im using a 64 bits system and mingw32 can't handle this?
Any help would be appreciated.
I'm done with it. I went to Project->Properties->C/C++Build
DeleteTool settings tab-> Cross ARM C++ Compiler and in optimization marked
ISO 2011 C++ (-std=c++0x)
Everything was ok. If someone has the same problem that seems to be the solution.
Hello! I am from Argentina.
ReplyDeleteit's all ok! Works perfect!
Thank you very much!
:-)
Pablo
Hello Jorge,
ReplyDeleteThanks for the tutorial! It's a great help!
I managed to do everything up to the LED wheel. I've set a breakpoint in interrupt::TIM6_DAC() but the handler never seems to be called.
(BTW, are there any restrictions to debug an interrupt handler?)
Another issue I encountered was that the programs run fine if I set a breakpoint in main and then resume the program. If I don't set a breakpoint in the program, the binary seems to be flashed okay and the debugger stops at PC 0x0, but after resuming the program nothing happens. The debugger shows "Thread[1](Running)" but nothing happens.
Any ideas?
Thanks again for this detailed tutorial!
Kind regards!
PS: I'm using the STM32F4DISCOVERY on Ubuntu 12.04. All other tools as in your tutorial.
DeleteHello Anon,
Delete1) About the interrupts, make sure you have added "#include " to the file "interrupt.cpp" under the "src" folder. Otherwise the interrupts won't work.
2) AFAIK the only restriction while debugging is the number of breakpoints available, I've had no issues debugging interrupts.
3) When using the DISCOVERY boards sometimes (almost always?) you can't debug after flashing a new program, you need to reflash the same program in the board to be able to debug. This doesn't happens when I use the F4Dev, which uses a FTDI based JTAG programmer.
Have fun!
Hi Jorge,
ReplyDeleteThanks you so much.
I followed your steps.
Before step of Blinking a LED, every result is the same as your, but when I am working on the Blinking a LED, and run OpenOCD, there is an error below
couldn't bind to socket: Address already in use
Would you like to help me to figure out it?
Thanks,
Weiming Han
Hello Weiming,
DeleteYou can only have one openocd session running at a time. Be sure to close the existing openocd session when you are done debugging. Or equivalently leave open the openocd session and only execute the debug (a.k.a. Flash and Debug) session.
I hope that solves your problem.
Cheers.
Hello Jorge,
DeleteThanks for your help!
It works!
Thanks again,
Weiming Han
Everything is working great.
ReplyDeleteCan you expound a little on the interrupt solution?
About the interrupts, make sure you have added "#include " to the file "interrupt.cpp" under the "src" folder. Otherwise the interrupts won't work.
Thanks for your great work.
Hello Anon,
DeleteIn the interrupt.cpp file (inside the src folder) you need to map the pointers to the interrupt functions to a device specific memory address region (e.g. the word at 0x04 must point to the timer1 interrupt handler function) . I left this blank in bareCortexM, because that project template is device-agnostic.
In the libstm32pp project I have included a file named interrupt_cpp.hpp (in the include folder), this file contains the interrupt memory mapping I explained before for every supported STM32 device.
Since the file has a header (.hpp) extension it won't get compiled and the interrupts won't work (this also makes the program footprint smaller). And you need to compile the memory mapping contained inside interrupt_cpp.hpp to get the interrupts workings.
You can achieve this by adding the following line to the interrupt.cpp file:
#include "interrupt_cpp.hpp"
This is equivalent to copying the content of interrupt_cpp.hpp to interrupt.cpp. By doing this, the interrupt memory mapping will get loaded in the program and the interrupts will work.
I hope it's clearer now.
Thanks a lot for this tutorial, it's absolutely amazing!
ReplyDeleteSome notes from my installation on Windows 7 64-bit with the main goal of getting flashing and debugging on the STM32F4 Discovery to work:
1. The link to MingGW does not work any more. I used the official download from http://www.mingw.org/ and choose the all default (which will install the C compilator as well) to get minggw32-make.
2. To get OpenOCD to connect succesfully to the ST-Link V2 on the board I had to install the official drivers from ST's homepage, the FTDI drivers did not work and only resulted in error messages when starting OpenOCD.
3. More of a side note: When downloading from the git master branch the project name of bareCortexM will be bareCortexM-master, thus the .elf file, which is hard-coded to bareCortexM in the gdb script was not found when flashing and debugging. A small change on the "write_image" line fixed it.
4. To be able to debug properly i had to add the following lines to the GDB script:
symbol-file bin/bareCortexM-master.elf
thbreak main
continue
It would then start debugging and stop at the main function correctly.
Thanks again for making this tutorial and I hope that my notes will help anyone having the same problems!
Hello TDM,
DeleteIt's good to know that this post is useful to you. Regarding the issues you found:
1.- Indeed, the Trolltech FTP server has been shutdown, I've posted a mirror (provided by ShaoLin on his blog). Actually, you can use the make from any MinGW suite (don't know about MSVC), but I use the v4.4 as it works with Qt.
2.- The DISCOVERY boards use the ST-Link for flashing and debugging. You need their drivers to use OpenOCD, I think my board installed them after I plugged it. The FTDI drivers are for FTDI based programmers. (ST-Link are NOT FTDI based)
3.- Cloning the repository (using git) doesn't result in this problem (wrong project name). A workaround for downloading instead of cloning, should be removing the "-master" from the zip file name before unzipping.
4.- A correct project name shouldn't present this problem.
Thank you very much for you comment! I'm sure it will be helpful to others.
Hi,
ReplyDeleteNo matter what I do, I can't get the "led_wheel.cpp" to work on my stm32f4-discovery.
Ihave setup the clock to PLL_SELECTED_AS_SYSTEM_CLOCK in the clock.hpp file.
I have added the interrupt_cpp.hpp into the src/interrupt.cpp. I have also tried to print out the AHB clock value, but I see only 0:
abi=hard -mfpu=fpv4-sp-d16 -g3 -gdwarf-2 -o "src/main.o" "../src/main.cpp"
../src/main.cpp:68:1: error: aggregate '_<0> __' has incomplete type and cannot be defined
make: *** [src/main.o] Error 1
Any clue, what could be wrong?
Best regards,
Chafik
Hello Chafik,
DeleteLet's rule out some possible problems by doing a incremental test:
a) Try the simplest program of augmenting the value of a variable? (See "The first program" in this post)
-> If this works, then GCC, OpenOCD, flashing and debugging all work. Otherwise check that you have configured them correctly.
b) Try the LED blink program.
-> If this works, then you have correctly linked the libstm32pp library. Otherwise check that you have added the proper include path.
c) Try the LED wheel program again.
-> If this works, then you have correctly add the interrupt support. Otherwise check the src/interrupt.cpp file.
What you describe as (clk::AHB = 0) is really odd, the program shouldn't even compile, because I added static assertions that verify that all frequencies are inside their allowed limits.
If you have made any changes to clock.hpp, try to using a unmodified version (either by doing a git checkout or by download a fresh copy of the file: https://github.com/JorgeAparicio/libstm32pp/blob/master/include/clock.hpp)
Let me know if you still have issues.
Hello,
DeleteThanks for taking the time to answer my questions.
Actually, I went already through steps a) and b) without any problems, and I could use both openocd and the first LED blink program.
But today, after re-doing a git clone of both bareCortexM and libstm32pp, I got everything working. Thanks for the tip. It seems something went wrong the first time (?).
May I have a another question regarding libthread. I got an application that uses threads "pthread.h". Is it possible to port to STM32F4disc. I have a makefile that I used to compile for armlinux and that I have changed to build my ELF file for the STM32F4, and that works, but as soon as I try to add the threaded application it cannot compile anymore.
Here is what seems to build well for me without
===============================================================
CC := arm-none-eabi-gcc
CFLAGS = -c -std=c99 -pedantic -mcpu=cortex-m4 -mthumb -msoft-float -Os -Wall
LD := arm-none-eabi-ld
LDFLAGS = --verbose
LDEXTRA = --end-group --no-whole-archive -lm -lc -Larm-none-eabi/lib/thumb2 -L/lib/gcc/arm-none-eabi/4.7.2/thumb2 -lgcc
ASFLAGS = --gdwarf2 -mcpu=cortex-m4 -mthumb
ASEXTRA = -g
==================================================================
This is the error I get:
error: unknown type name 'pthread_mutex_t'
implicit declaration of function 'pthread_mutex_init' [-Wimplicit-function-declaration]
Help on this matter is greatly appreciated :)
Best regards,
Chafik
Well, I know nothing about thread programming. But after checking the file, I saw that all the code was grayed out because of a "#ifdef _POSIX_THREADS" directive.
DeleteAfter defining that variable right before including the header, I can now declare pthread_mutex_t variables.
// This works/compiles!
#define _POSIX_THREADS
#include
pthread_mutex_t foo;
Hope that helps
I meant: ... after checking the (less than sign)pthread.h(greater than sign) file, ...
Deleteand: #include (less than sign)pthread.h(greater than sign)
The browser probably interpreted it as html tags, and that's why they don't show on the previous comment
Good day,
ReplyDeleteHello,
I have a question, because in problem happens during debug init.
When launch Debug inside the window Debug configuration.
A message appears in pop-up box.
#
Error creating session.
Cannot run program "arm-none-eabi-gdx" Unknown reason.
#
The same message appears when I clic on the "green bug icon".
I have searched for this mistake through Google.
I have found an answer for LPCXpresso Tool. For their tools, this is a problem inside the PATH. They extend the PATH to many /bin directories.
I am working with Linux Ubuntu 12.04 with STM32DISCOVERY Board. Perhaps this is the same problem, but I don't cross their remedy with my configuration running for STM32DISCOVERY.
Would you like help me?
Thank in advance (for your help).
I am French,many thanks of you for your work.
Best regards.
I'm sorry for my English.
Patrick
Hello Patrick,
DeleteFirst, does the program compiles? If not, probably the PATH is misconfigured. What does this command outputs in the terminal:
$ arm-none-eabi-gcc --version
If it outputs command not found. Then, yes the problem is the PATH variable.
Make sure the .profile file has the correct path (See the "Dependency: GCC" part of this post)
Did you copy paste the text of the pop-up box? Because it should say "arm-none-eabi-gdb" instead of "arm-none-eabi-gdx". It it does say "gdx" then you may have changed some settings, the fastest way to correct it would be to clone the Eclipse project again.
And if you are using the STM32DISCOVERY board, make sure you properly configure the linker script, openocd and the debugger. My Eclipse project template works out of the box with the STM32F4DISCOVERY, other board/devices need the configuration mentioned before.
Hope that helps
Please help me how compile and debug in Eclipse a project use CMSIS library, with C language
ReplyDeleteI'm sorry nhut, I don't have spare time right now to help you with that. Please refer the STM documentation to do that, it requires quite some effort on your part, but it can be done. I've done it before.
DeleteGood Luck.
Hi, Thanks for the great writeup - until now I have always just used text editor and make command, but am wanting to explore debugging.
ReplyDeleteI get as far as hitting resume in the debugger, however from there what happens diverges from that expected from your instructions.
First off it seems to suspend on its own straight away. I do not have to press suspend. The value of foo at this point is still 0. Then if I press resume again, it seems to resume but the suspend button remains greyed out, the bi-colour (COM) LED on the STM32F4-Discovery stays toggling green/red indefinitely.
Any ideas?
kubuntu 12.04
openocd 0.6.1 (from the link you provide),
Eclipse Indigo,
If anything else is relevant please ask.
also I don't have an option for the Assembly window in the menu :(.
DeleteHey mangodan,
DeleteSorry for the late reply. The most common problem I've experienced with the discovery boards is that I need to flash the program TWICE before I can start debugging.
This is: Launch OpenOCD, launch debugger (won't work), close debugger, close OpenOCD, launch OpenOCD, launch debugger (now it works).
To get the assembly view, you have to go to Menu > Window > Show View > Other...
On the Debug category, select Disassembly.
Hope that helps.
I too am facing the same problem have you found any solution for this.
Delete-tintin
Hello Jorge,
ReplyDeleteI have a small issue (though it may not be an issue at all) but it really frustrates me that one. I am using Ubuntu 12.04 LTS x64 (my experience in the Linux world is about 2 weeks:) ), and I followed every step of the instructions you provided with a little change on my part. You see I made my own board (using an STM32F100CBT7 chip - 48LQFP - I used the scripts for the stm32f100rb during the configuration of the Eclipse enviroment) and designed it look just like the STM32VLDiscovery. So it has an ext HSE (8MHz oscillator), ext LSE (32,768kHz osc), two jumpers for BOOT0 and BOOT1 selection, Reset button, STLINKv2 SWD header (the 6 pin straight header), and external power supply. I program this board via my STM32L1Discovery kit, using as external programmer and debugger. I can program and debug just fine .I used your LED example (modified it just very little bit, just changed the name of the pins actually) , and it worked fine. But there's something really bugging me.
You see , when I do Flash and Debug, I run the program it executes just fine, then I click terminate for the debugger and then the OCD (the leds just stop), then I unplug the Stlink header (that I used to program the board), I push the Reset button of the board and NOTHING happens. The board does not reset itself, and the leds do not toggle. Actually to reset the board I have to turn it off and on again. I though that this issue might be a board's issue, but it wasn't.
I switched to my Windows 7, made a similar project (toggling leds) on the CooCox CoIDE (which also uses GNU ARM GCC , it also uses the exact same version of it) and I tried the same debug/reset scenarion. I went into a debug session, I suspended, detached the programming header and pressed Reset, and after I pressed it the leds started toggling - so no issue here (I did not have to power off and on again the board).
So what may be the issue? I was thinking maybe it's some missing vector delcaration/setup (I though maybe the reset and power down generate different exceptions, and maybe one of them is missing). Can you look at it and provide a solution.
Btw, once I turn off and on the board, the reset works fine (that is while the Reset button is pressed, the leds are off, only when its released they start blinking). But that is untill I do another flash and debug session with the OpenOCD
Thanks,
Georgi
Hi Jorge
ReplyDeleteI am having a small problem under eclipse when I change the target for the blink app from stm32f4xx to a stm32F1xx processor in device-select.hpp. (either with or without VALUE_LINE switch). The code works well ion my F4 Discovery.
a) gpio::moder is unrecognised in main.c
I think it should be gpio::cr::.....
The ::cr:: does not show in code completion
b) in peripheral/gpio.hpp line 56 and 60 - I get teh message 'Function bitband::peripheral could not be resolved'
c) in include/bitband.hpp teh templates have a yellow underline and the enormously helpful 'Syntax Error' tag.
I've looked at the syntax and it looks OK - I'm not a template master, but it looks similar to the other templates
any ideas what I am doing wrong?
namespace bitband {
template
constexpr u32 peripheral()
{
static_assert(
((Address - alias::PERIPH) >= 0) &&
((Address - alias::PERIPH) < 0x100000),
"This is not a valid Peripheral address for bit-banding."
);
static_assert(Bit < 32, "Only 32 bits can be bit-banded.");
return PERIPH + ((Address - alias::PERIPH) << 5) + (Bit << 2);
}
.....
The template is marked from and including the word 'template'
My compiler is under mingw on windows
gcc version 4.7.3 20121207 (release) [ARM/embedded-4_7-branch revision 194305] (
GNU Tools for ARM Embedded Processors)
I am trying to see if I can get this to work on a stm32F103 Medium density board (although I have F4, Value line, 107 and high density devices to test on)
many thanks
Chris
This comment has been removed by the author.
ReplyDeleteHello Jorge,
ReplyDeleteI have ordered the STM32F4DISCOVERY, STM32F4DIS-BB EXPANSION & ST-LINK/V2 ICD/PROGRAMMER. This is my first time with ARM uC. I have good experience with Atmel AVRs 8bit and used CodeVisionAVR which fortunately provides a very good code wizard so that the i can initialize all the uC peripherals i want without worrying about anything else but the real code in the main loop. Is anything close to such a code wizard that can produce code regarding STM32s helping me with the initialization of the uC peripherals? To be honest that gives me the creeps! I am used in having the initialization code ready or play with it using the integrated codewizard of the latest CodeVisionAVR. The thing is that i have to dig in the manual and check out all the registers i need to set up and that is time consuming when you need to use lots of the uC features.
I have already prepared and compiled the software needed up to the point of "The first program" with out any difficulties. I hope i can do all the rest without any problems.
I am using Ubuntu 10.10 Maverick 64bit as i do not really like the latest "goodies" added in the ubuntu distros. Anyway, you have my sincere thanks about the time you spent on this tutorial which made our lives a lot easier especially guys like me starting a fresh relationship with STM32s!
My Best regards from Cyprus
Manos
Hi,
ReplyDeleteI am getting an error while trying to debug...
Open On-Chip Debugger 0.7.0-rc2 (2013-04-29-00:14)
Licensed under GNU GPL v2
For bug reports, read
http://openocd.sourceforge.net/doc/doxygen/bugs.html
Error: The specified debug interface was not found (stlink)
The following debug interfaces are available:
1: ft2232
2: hla
Runtime Error: openocd/interface/stlink-v2.cfg:26:
in procedure 'script'
at file "embedded:startup.tcl", line 58
in procedure 'interface' called at file "openocd/interface/stlink-v2.cfg", line 26
Hi,
DeleteWhen i tried to do "make" with openocd 0.7.x i got an error message. You need to remember that you have to do "configure" with the options given from Jorge. If you do that and then proceed to "make" you will get some error message(s). At least i did. However if you do "configure" without the options given above then doing "make" end up successful. Openocd 0.6.1 is the latest stable and also works with the options given by Jorge in order to include support for stlink etc.
One problem i have after doing all the goodies in Jorge's tuto is that i have to restart a couple of times Eclipse until i manage to flash and debug on my STM32F4 discovery board. If i stop the debugger, it won't start giving me an error message about an environment var $(project_lock). So i need to restart Eclipse at least once to be able to run openocd and 'flash and debug'.
QUOTE
'Launching OpenOCD" has encountered a problem
Variable references empty selection: ${project_loc}
UNQUOTE
Has anybody got a solution about this?
I am on Ubuntu 10.10 64bit
I have tried CooCox which is free but only on windows. It is also based on Eclipse and same arm gnu toolchain! Weird while all the tools are open source the developers insist on windows. It's really a same but works much better. However it does not support debugging for STM32s. :-(
You can use ${workspace_loc:/_your_project_name_} in "Working directory" of OpenOCD configuration or absolute path.
DeleteBefore you run your openOCD you need to select your project in the project explorer so that Eclipse can know which project’s location you want to refer to.
DeleteHello Jorge,
ReplyDeleteI have tried to use the ST peripherals library but it was a disaster. Lots of error messages and unresolved includes. The more header files i added the less the errors until i finally ended up without any errors but the flash and debug just didn't work. Can you help?
Amazing tutorial!
ReplyDeleteThank you very much, Jorge!
Thank you so much for this great tutorial !
ReplyDeleteEverything seems to work here on my Windows Vista PC.
Xavier
Hi Jorge,
ReplyDeleteI'm trying to use your setup with my projects but I'm stuck when trying to include a .s file in the project. (Yes, it's a startup).
As the compiler didn't seem to pick it, I have tried to edit properties of the file and there seems to be no compatible tool in the toolchain.
If I untick the "display compatible toolchains only" option and force "ARM Sourceru Windows GCC Assembler" as tool I get a subdir.mk file with the following error:
# Add inputs and outputs from these tool invocations to the build variables
null./ST/STM32F4xx/Source/Templates...
Could you give me any clue on where to look?
Thanks in advance,
Pedro.
I answer myself:
DeleteIt was the .s extension, it had to be renamed .S and everything has started working.
Thanks for your tutorial.
Again this reply is for other google warriors out there.
DeleteIf you go to eclipse(I use kepler) "Window/Preferences/C/C++/File Types" click on "New" button at the right. Add *.S as "Pattern" and "Assembly Source File" as type.
Thanks for an awesome guide. Do you still recommend using Eclipse Indigo instead of juno?
ReplyDeleteGreat tutorial,
ReplyDeleteI just have few problems. Since I used esden summon arm tool chain instead of CS. I have installed eclipse and I can use the summon arm tool chain. The program builds and everything is fine but when I try to debug. It does not go to the correct line on start. Also If I single step it, the variable values are not what are expected and the sequence in the code is not followed. Can you help.
I have used the o0 flag as suggested.
Can it be a problem with toolchain. I am a newbee to arm as well as linux.
Regards,
nd
http://sourceforge.net/projects/gnuarmeclipse/files/Eclipse/updates/
ReplyDeleteShould be the right path for GNU ARM plugin
I'm a bit confused about how to set up the clocks. If I'm using a stm32f4discovery board, do I need to make any changes in clock.hpp?
ReplyDeleteYou probably sorted it out already, but for those google warriors like me. Yes, you have to fiddle with the clock.hpp if you wanted to change the core frequency. Key sections are the clock source, plls and dividers. I managed to build the demos following the instructions. I'm also using stm32f4discovery.
DeleteCan we get a sample of using interrupt priority? I'm kind of new to C++. I did try this:
ReplyDeleteNVIC::setPriority(); just to see if it would build and it does. But I'm still not sure if it it's correct.
Thanks for the great tutorial and libs.
Hmmn, it didn't accept to the full code for the NVIC it got truncated.
DeleteThank you very much for this wonderful and clear tutorial.
ReplyDeleteI had a strange thing happening with STM32F4Discovery - openODB (GDB). I would only be able to flash and debug once. Then the option bits would be set randomly (?) and prevent writing. I then had to use STM32 ST-LINK Utility.exe (v3.1.0) to change them (Target > Option Bytes).
The problem is solved by changing the last line in
\bareCortexM-master\gdb\stm32f407vg.script from
monitor soft_reset_halt
to
monitor reset halt
I had read that soft_reset_halt was deprecated and perhaps because I'm using the latest versions it causes problems.
The version I use are
stm32f4discovery board firmware: V2.J17.S0 JTAG Debugger
GNU ARM: 4.7-2013-q2-update
Make: 3.81
Java JRE: 1.7.0_25-b17
Eclipse IDE for C/C++ Developers: Kepler, Build id: 20130614-0229
- Eclipse IDE for C/C++ Developers 2.0.0.20130613-0530
- CDT, C/C++ Development Tools SDK, 8.1.2.201302132326
- GNU ARM C/C++ Development Support, 0.5.4.201202210114
- Zylin Embedded CDT, 4.18.1
openOCD, 0.7.0
Again thank you for the great help
Changing to "monitor reset halt" is not a fix. Problem re-occured. Read Protection Bits in STM32F4 are being set by openOCD but I cannot re-produce the error repeatedly. Switched to using gdb/stm32f4_16kb.script. Problem has not happened in a while.
DeleteHi Jorge,
ReplyDeleteFirst of all thank you for this tutorial. It is very helpful especially for me as an enthusiast in the embedded programming.
A couple of months ago, I bought an STM32 dev board STM3210E-Eval thinking that I can do some embedded UI development. Then I realized that the IAR I am using is limited to 32kb code size.
Now I have to use open source development environment like Eclipse + GCC so I can have unlimited code size.
Do you have suggestion on steps that I need to do? How did you create the bareCortexM master? How can I do the same in different device (i.e stm32f103)? My codes are in C++ and my debugger is Olimex ARM-USB-OCD.
Thank you in advance.
Best Regards.
Thanks for this introduction. It's really great and I got it working without problems (using Eclipse Kepler BTW).
ReplyDeleteThe only thing that I find quite annoying is that you have put the source files (in src/) under GPL. Do you think it is possible to change that to LGPL? Else I'll have to rewrite all that stuff. I already found sources from ST etc. and I can do it. But I'd really like to use your code as a base (I like that you took a C++ approach -- should have a larger share in embedded programming for a long time already),
This comment has been removed by the author.
ReplyDeleteHi Jorge et al,
ReplyDeleteSince Jorge seems unavailable, I forked libstm32pp. @ https://github.com/jaqueza/libstm32pp
Added Systick, RTC, and USART interrupts.
Tested only with stm32f4-discovery board.
The RTC is tested with low speed internal (LSI) clock. Watch out for registers
that always reads 0 ( I can't remember right now) when debugging RTC.
Any feeback and corrections will alwasy be appreciated.
Hello,
ReplyDeleteKeep getting this error:
In file included from ../src/system_call.cpp:28:0:
C:\Programs\Example\bareCortexM\libstm32pp-master\include/system_call_cpp.hpp:32:30: error: declaration of C function 'int _write(int, char*, int)' conflicts with
C:\mingw\include/io.h:258:37: error: previous declaration 'int _write(int, const void*, unsigned int)' here
C:\Programs\Example\bareCortexM\libstm32pp-master\include/system_call_cpp.hpp: In function 'int _open(const char*, int, int)':
C:\Programs\Example\bareCortexM\libstm32pp-master\include/system_call_cpp.hpp:38:50: error: declaration of C function 'int _open(const char*, int, int)' conflicts with
C:\mingw\include/io.h:239:37: error: previous declaration 'int _open(const char*, int, ...)' here
C:\Programs\Example\bareCortexM\libstm32pp-master\include/system_call_cpp.hpp: In function 'void _exit(int)':
C:\Programs\Example\bareCortexM\libstm32pp-master\include/system_call_cpp.hpp:57:24: warning: deprecated conversion from string constant to 'char*' [-Wwrite-strings]
C:\Programs\Example\bareCortexM\libstm32pp-master\include/system_call_cpp.hpp: In function 'int _fstat(int, stat*)':
C:\Programs\Example\bareCortexM\libstm32pp-master\include/system_call_cpp.hpp:69:7: error: invalid use of incomplete type 'struct stat'
C:\Programs\Example\bareCortexM\libstm32pp-master\include/system_call_cpp.hpp:67:31: error: forward declaration of 'struct stat'
C:\Programs\Example\bareCortexM\libstm32pp-master\include/system_call_cpp.hpp:69:19: error: 'S_IFCHR' was not declared in this scope
C:\Programs\Example\bareCortexM\libstm32pp-master\include/system_call_cpp.hpp: In function 'int _lseek(int, int, int)':
C:\Programs\Example\bareCortexM\libstm32pp-master\include/system_call_cpp.hpp:106:40: error: declaration of C function 'int _lseek(int, int, int)' conflicts with
C:\mingw\include/io.h:236:38: error: previous declaration 'long int _lseek(int, long int, int)' here
C:\Programs\Example\bareCortexM\libstm32pp-master\include/system_call_cpp.hpp: In function 'int _read(int, char*, int)':
C:\Programs\Example\bareCortexM\libstm32pp-master\include/system_call_cpp.hpp:115:41: error: declaration of C function 'int _read(int, char*, int)' conflicts with
C:\mingw\include/io.h:243:37: error: previous declaration 'int _read(int, void*, unsigned int)' here
C:\Programs\Example\bareCortexM\libstm32pp-master\include/system_call_cpp.hpp: At global scope:
C:\Programs\Example\bareCortexM\libstm32pp-master\include/system_call_cpp.hpp:124:3: error: 'caddr_t' does not name a type
mingw32-make: *** [src/system_call.o] Error 1
Any ideas anyone? I've spent long time on it and can't find the issue. It's at the point when you're trying to use new,delete and printf(C++ functions)...
Thanks
Hi Mike,
ReplyDeleteFirst off, you might want to upgrade your toolchain:
https://launchpad.net/gcc-arm-embedded they just released the 3rd quarter update.
Unfortunately I don't get an error if I use new or delete.
With printf, it's kind of odd, I'm not getting any error even if I don't include "system_call_cpp.hpp" though I'm not getting any serial output, If I do include it, serial out is fine.
check the output: http://tinypic.com/r/hvuwbl/5
Sorry if this is of no help. (I should mention tho, that I'm on Linux using eclipse Kepler, I'm thinking maybe it's a PATH problem, also I don't exactly use the bareCortexM project, although I used most of it's content. I wanted to try if I could setup my own project with eclipse and it works. I also tried to setup debugger without Zylin and it also works and seems faster)
Thanks jqz,
DeleteI have managed to sort this problem out. I have come across another one though. This one is shorter:
make: [clean] Error 2 (ignored) bareCortexM
C/C++ Problem
Any hints as to what the source of this can be?
That's a little too short for an error :)
DeleteYou can try adding -v (verbose option to gcc/g++) to get more info.
In Project->Properties->C/C++ Build->Settings->Tool Settings.
Add the verbose option to command (e.g. where it says arm-none-eabi-g++, since that's the only place you can actually add that option).
Maybe add the same option to the arm-none-eabi-gcc too.
My mistake you can actually add the -v option in Miscellaneous other flags.
Deleteif you're not tied with libstm32pp yet, you may want to check this:
ReplyDeletehttp://andybrown.me.uk/wk/2013/03/30/stm32plus-2-1-0/
It seems complete and uses the CMSIS.
Hello Jorge,
ReplyDeleteI have a Problem to Build your Eclipse BareCortex template. I get follow mesage:
**** Build of configuration Linux for project bareCortexM ****
make all
Building file: ../src/exception.cpp
Invoking: ARM Sourcery Linux GCC C++ Compiler
arm-none-eabi-g++ -O0 -ffunction-sections -fdata-sections -fsingle-precision-constant -Wall -std=gnu++0x -Wa,-adhlns="src/exception.o.lst" -fno-exceptions -fno-rtti -c -fmessage-length=0 -MMD -MP -MF"src/exception.d" -MT"src/exception.d" -mcpu=cortex-m3 -mthumb -g3 -o "src/exception.o" "../src/exception.cpp"
/bin/sh: 1: arm-none-eabi-g++: not found
make: *** [src/exception.o] Error 127
**** Build Finished ****
Of course I have set the PATH Variable,
I can make arm-none-eabi-gcc --version
arm-none-eabi-gcc (GNU Tools for ARM Embedded Processors) 4.7.4 20130913 (release) [ARM/embedded-4_7-branch revision 202601]
Copyright (C) 2012 Free Software Foundation, Inc.
This is free software; see the source for copying conditions. There is NO
warranty; not even for MERCHANTABILITY or FITNESS FOR A PARTICULAR PURPOSE.
This comment has been removed by the author.
ReplyDeleteThis comment has been removed by the author.
DeleteI have a question about the following:
ReplyDeletecd
git clone https://github.com/JorgeAparicio/libstm32pp.git
Where can I find the bareCortexM folder where the projects resides?
You can find it searching for "bareCortexM-master". It might be in your download folder.
DeleteThe bareCortexM folder you can find as 'bareCortexM-master' folder where you downloaded the bareCortexM-master.zip file. (answering my own questions is also fun ;)
DeleteYou have to watch out that the settings in eclipse might be looking for bareCortexM without the master. So you would have to rename it.
DeleteI use download this Eclipse version "eclipse-cpp-indigo-SR2-incubation-win32".
ReplyDeleteThen I try to install GNU ARM C/C++ plugin by this url: http://gnuarmeclipse.sourceforge.net/update.
But Eclipse says "Cannot complete the install because one or more required items could not be found".
Please help me to install this.
I have same problem, if anyone solved this please let me know..
DeleteSame problem here :C
Deletenice job bro,keep going on...
ReplyDeleteThis comment has been removed by the author.
ReplyDeleteHi, thank you for this immensely useful and detailed tutorial! I managed to set everything up but am having trouble with compiling the initial cpp file as I get the following error: make: *** No rule to make target `bareCortexM.elf', needed by `all'. Stop.
ReplyDeletemore details:
OS: OSX 10.9.1
Eclipse: 4.3.1 (Kepler SR1)
toolchain: presetup ARM toolchain obtained from launchpad (4.7.4)
OpenOCD 0.7.0
board: stm32F4DISCOVERY
all other plugins required have been recently downloaded from the source links and are the latest versions running.
using the command line I was sucessfully able to compile and load code on to my board with the openOCD and GNU toolchain I setup.
I deviated from your tutorial by replacing "-f openocd/interface/.cfg" and "-f openocd/target/.cfg" with "openocd -f board/stm32f4discovery.cfg" but did not actually succeed far enough to find out if it makes a difference. additionally I went to Project > Properties > C/C++ Build > Toolchain editor and selected ARM OS X GCC Sourcery Lite Bare as my toolchain with the configuration left as Linux.
I tried different toolchain configurations when this did not work and that too failed and on reading your comment above regarding the bug with the CDT eclipse plugin I started a new project but got the same results.
thanks
Another free development IDE is Code::Blocks and with Embedded plugin suite (EPS Debugger) supports some of discovery boards directly and most of STM32 devices. With free version you can utilize up to 25% of device flash memory capacity which could be enough also for medium sized project. Successfully compiled and debugged Chibi/OS and FreeRTOS with it. Includes also project wizard where with few clicks the basic project or example can be created. It has big advantage that you do not need to bother with complicated setup process.
DeleteDownload here:
http://www.comsytec.eu/en/online-store/detail/flypage|eps/112-codeblocks-eps--embedded-plugin-suite?pop=0&sef=hfp
Thanks a lot, it work for me with kepler gnu arm 4.8 2013q4 win7 and stm32 discovery
ReplyDeleteI used the default CDT new c project "stm32f4xx" that pull in all the lib in the project. It did built almost out of the box just had to edit require stiff in the stm32f4xx.h and define HSE_VALUE 8000000 in toolchain symbols to avoid error in ystem_stm32f4xx.h
#define HSE_VALUE ((uint32_t)25000000)
I also used CDT internal builder (avoid changing make to mingw32 make)
Hi guys, it's been a while since I played with my disco board and I'm starting again. For anyone that uses distro other than Ubuntu and wanting to view their serial output within eclipse without launching an external program you can try this:
ReplyDeleteDownload RxTx precompiled here: http://chemicaloliver.net/tag/rxtx/ (not my site BTW) extract and install to respective location. I am on 64bit SalixOs so I copied librxtxSerial.so to my /usr/lib64 and the RXTXcomm.jar to /usr/lib64/java/jre/lib/ext/ , your location depends on your distro.
Then innstall Target Management Terminal via Help->Install New Software->(SelectYourSite-I_used_Kepler - http://download.eclipse.org/releases/kepler)->Mobile and Device Management. Restart eclipse.
You can then open the terminal tab via Window->Show View->Other (if not available on current list)->Terminal. You can then change the settings to your needs. Click settings (right hand of the tab) change Connection type to serial.
Hopefully it also works for you guys.
For Ubuntu users, except for the RxTx the procedure is ofcourse the same :)
I believe the RxTx library is in the repository.
Good Luck!
Hi guys, I built the barecotexM project etc, set it all up, but must of made a mistake somewhere, when i try to 'Flash and Debug'
ReplyDeleteI get an error:
Error creating session
arm-none-eabi-gcc: error: unrecognized command line option '-q'
arm-none-eabi-gcc: error: unrecognized command line option '-q'
arm-none-eabi-gcc: error: unrecognized command line option '-q'
Any ideas?
I'm completely new to this, all pretty damned confusing tbh.
Cheers,
Dan
Scratch that, just copy and pasted from:
ReplyDeleteDebug Configurations > C/C++ Application > bareCortexM > Debugger > Command File > /usr/bin/gdb
To:
Debug Configurations > Zylin Flash and Debug > Debugger > Command File.
Zylin command file was set to arm-none-eabi-gcc, worked after changing it to /usr/bin/gdb
Guessing its the location of the gdb file or something, no idea, it worked though.
Doing this as a project to try for a new job so glad its working.
Dan
Hello ,
ReplyDeleteI tried to compile the project with
Eclipse Indigo Service Release 2
mingw32-make,
gnu tools arm embedded/4.8 2014q2
But got the following error:
xit.c:(.text.exit+0x16): undefined reference to `_exit'
Do you have any idea of the problem ?
Regards
Thanks for this tutorial. But I run on some problem. Followed steps but when it came to build I get in console:
ReplyDelete**** Build of configuration Linux for project bareCortexM ****
Nothing to build for project bareCortexM
So I checked project properties "C/C++ Build":
Orphaned configuration. No base extension cfg exists for org.eclipse.cdt.cross.arm.gnu.sourcery.linux.elf.debug.952806260
Any hint?
Cheers
Janusz
Hi Jorge, I'm trying to test your demos inside libstm32pp and I'm finding this errors:
ReplyDelete'Invoking: Cross ARM C++ Compiler'
arm-none-eabi-g++ -mcpu=cortex-m3 -mthumb -Os -fmessage-length=0 -fsigned-char -ffunction-sections -fdata-sections -g -I"D:\Mingw\include" -I"C:\Users\Nelo\bareCortexM\libstm32pp\include" -std=c++0x -MMD -MP -MF"src/main.d" -MT"src/main.o" -c -o "src/main.o" "../src/main.cpp"
In file included from ../src/main.cpp:30:0:
C:\Users\Nelo\bareCortexM\libstm32pp\include/peripheral/gpio.hpp: In instantiation of 'gpio::Pin<(gpio::Address)1073872896u, 0u>':
../src/main.cpp:37:6: instantiated from here
C:\Users\Nelo\bareCortexM\libstm32pp\include/peripheral/gpio.hpp:117:12: error: 'const u32 bitband::peripheral() [with unsigned int Address = 1073872916u, unsigned char Bit = 0u, u32 = unsigned int]' is not a constexpr function
C:\Users\Nelo\bareCortexM\libstm32pp\include/peripheral/gpio.hpp:117:12: error: enumerator value for 'OUT_ADDRESS' is not an integer constant
C:\Users\Nelo\bareCortexM\libstm32pp\include/peripheral/gpio.hpp: In instantiation of 'gpio::Pin<(gpio::Address)1073872896u, 0u>':
../src/main.cpp:37:6: instantiated from here
C:\Users\Nelo\bareCortexM\libstm32pp\include/peripheral/gpio.hpp:117:12: error: 'const u32 bitband::peripheral() [with unsigned int Address = 1073872912u, unsigned char Bit = 0u, u32 = unsigned int]' is not a constexpr function
C:\Users\Nelo\bareCortexM\libstm32pp\include/peripheral/gpio.hpp:117:12: error: enumerator value for 'IN_ADDRESS' is not an integer constant
src/subdir.mk:30: recipe for target 'src/main.o' failed
mingw32-make: *** [src/main.o] Error 1
Is this really an error? I mean, the error is located inside the enum definition in class Pin, but maybe its not a code but a configuration error in my project properties.
Thanks in advance
Hi, tank you for your description to build a tool chain for the STM32F4xx (Discovery f4) on a Windows7 system.
ReplyDeleteI follow you and have problems to load the elf-file.
What can be the reason ?
Thanks in advance
The output is:
Open On-Chip Debugger 0.6.1 (2012-10-07-10:39)
Licensed under GNU GPL v2
For bug reports, read
http://openocd.sourceforge.net/doc/doxygen/bugs.html
adapter speed: 1000 kHz
Info : clock speed 1000 kHz
Info : stm32f4x.cpu: hardware has 6 breakpoints, 4 watchpoints
Info : accepting 'gdb' connection from 3333
Info : stm32f4x errata detected - fixing incorrect MCU_IDCODE
Info : device id = 0x10006413
Info : flash size = 1024kbytes
Warn : acknowledgment received, but no packet pending
undefined debug reason 6 - target needs reset
Warn : target was in unknown state when halt was requested
target state: halted
target halted due to debug-request, current mode: Handler HardFault
xPSR: 0x01000003 pc: 0xfffffffe msp: 0xffffffd8
background polling: on
TAP: stm32f4x.cpu (enabled)
target state: halted
target halted due to debug-request, current mode: Handler HardFault
xPSR: 0x01000003 pc: 0xfffffffe msp: 0xffffffd8
Info : stm32f4x errata detected - fixing incorrect MCU_IDCODE
Info : device id = 0x10006413
Info : flash size = 1024kbytes
flash 'stm32f2x' found at 0x08000000
cleared protection for sectors 0 through 11 on flash bank 0
target state: halted
target halted due to debug-request, current mode: Thread
xPSR: 0x01000000 pc: 0xfffffffe msp: 0xfffffffc
erased sectors 0 through 11 on flash bank 0 in 16.005629s
Error: couldn't open bin/bareCortexM.elf
in procedure 'flash'
set protection for sectors 0 through 11 on flash bank 0
requesting target halt and executing a soft reset
This comment has been removed by the author.
ReplyDeleteThis comment has been removed by the author.
ReplyDeleteThe people at openOCD changed something in their development starting at openOCD-8.0 which causes Jörg's openOCD installation instructions not to work from 'make' and 'sudo make install' on. Up untile openOCD-7.0 Jörg's instructions are working. The people ate openOCD did something that makes the 'make' not being able to handle blank wildecards. Too bad.
ReplyDeleteThis tutorial is out of date. Everyone everywhere change everything all the time. Over the years coding for MCU embedded systems has become a swamp of defragmented dependencies between libraries, files and what not developed by separate parties it ain't funny anymore.
ReplyDeleteHow in gods name can anyone expect the same seamless streamlining as when things were offline if they continue to do this.
I don't know if the industry is doing this to itself or if some other force has led to this.
My idea is that it all began with 1. the internet and 2. deliberate compartimentalization of software production for the sake of 'organizing' between different parties involved and for fluent (ahem) adaptation and upgrade of software.
What definitely is the case is that this has alienated enthusiast outside the industry. This wasn't the case 20 or better said 30 years ago when packages were built from one house. Now it's become a ludicrous battle to even get the simplest things to work because of these constant dependencies and fragmentation. Evolution for the worse if you ask me.
I advise folks, even newbies, to go keep Jörge's general compilation guidelines in mind but step over to www.openstm32.org for a centralized single site installation of their Eclipse IDE for ARM MCU's and evaluation boards.
ReplyDeleteGood tutorial! Saved a lot of my time to start with stm32 on Ubuntu. Thank you.
ReplyDelete
ReplyDeleteHey friend, it is very well written article, thank you for the valuable and useful information you provide in this post. Keep up the good work! FYI, please check these depression, stress and anxiety related articles.
How to Build a Portfolio with ETFs, My vision for India in 2047 postcard, Essay on Unsung Heroes of Freedom Struggle
Great code, the author is handsome! It seemed to me that you have it too detailed and from this large in size, I think you can reduce it at least twice if you use pseudo-classes and identifiers, for example, I generally recommend watching a video on Instagram on how to shorten any code by almost five times and not cut it its functionality, unfortunately I don't remember the name of this account, but I do remember that it was posted by account that had about 48 thousand of followers! I am sure that the owner of this account are always buy instagram followers to quickly gain their number.
ReplyDeleteSummer Training For Electronics Engineering
ReplyDeleteEmbedded Programmer: Stm32F4Discovery Development With Gcc In Eclipse >>>>> Download Now
ReplyDelete>>>>> Download Full
Embedded Programmer: Stm32F4Discovery Development With Gcc In Eclipse >>>>> Download LINK
>>>>> Download Now
Embedded Programmer: Stm32F4Discovery Development With Gcc In Eclipse >>>>> Download Full
>>>>> Download LINK
To know about automated AI helpdesk and service desk with Rezolve.ai, visit the website and schedule your demo. To know more click here:
ReplyDeletemicrosoft teams hr help desk
I really admire your work. This is very helpful. I'm so impressed at your work. I hope to learn a lot from you. 텍사스홀덤
ReplyDeleteThis is such a great resource that you are providing and you give it away for free. I love seeing blog that understand the value of providing a quality resource for free. 룰렛사이트탑 사설토토
ReplyDeleteHey friend, it is very well written article, thank you for the valuable and useful information you provide in this post. Keep up the good work! FYI, please check these depression, stress and anxiety related articles.water based lubricant
ReplyDeletemale masturbation cup
https://bayanlarsitesi.com/
ReplyDeleteGöktürk
Yenidoğan
Şemsipaşa
Çağlayan
M18F
kars
ReplyDeletesinop
sakarya
ankara
çorum
K00İ
https://titandijital.com.tr/
ReplyDeletekars parça eşya taşıma
konya parça eşya taşıma
çankırı parça eşya taşıma
yalova parça eşya taşıma
6RJPMP
ankara parça eşya taşıma
ReplyDeletetakipçi satın al
antalya rent a car
antalya rent a car
ankara parça eşya taşıma
OTZ
Mersin Lojistik
ReplyDeleteAmasya Lojistik
Kayseri Lojistik
Kırklareli Lojistik
Erzurum Lojistik
TMN
DC83D
ReplyDeleteOsmaniye Şehir İçi Nakliyat
Mardin Evden Eve Nakliyat
Ünye Asma Tavan
Denizli Evden Eve Nakliyat
Van Parça Eşya Taşıma
Sivas Şehirler Arası Nakliyat
Niğde Evden Eve Nakliyat
Balıkesir Lojistik
Artvin Parça Eşya Taşıma
3F114
ReplyDeleteMaraş Parça Eşya Taşıma
Rize Evden Eve Nakliyat
Van Şehir İçi Nakliyat
Malatya Şehir İçi Nakliyat
Şırnak Şehirler Arası Nakliyat
Kırşehir Şehir İçi Nakliyat
Bayburt Şehirler Arası Nakliyat
Düzce Şehirler Arası Nakliyat
Muğla Şehirler Arası Nakliyat
E32D7
ReplyDeleteOrdu Şehir İçi Nakliyat
Bitlis Evden Eve Nakliyat
Mersin Şehir İçi Nakliyat
Çerkezköy Kurtarıcı
Erzincan Lojistik
Niğde Parça Eşya Taşıma
Antep Evden Eve Nakliyat
Ünye Çatı Ustası
Sivas Evden Eve Nakliyat
AD594
ReplyDeleteKilis Şehir İçi Nakliyat
Ordu Lojistik
Trabzon Şehirler Arası Nakliyat
Mardin Lojistik
Aksaray Lojistik
Kayseri Şehirler Arası Nakliyat
Aydın Parça Eşya Taşıma
Ankara Şehirler Arası Nakliyat
Kırşehir Şehirler Arası Nakliyat
49E21
ReplyDeleteKastamonu Parça Eşya Taşıma
Çerkezköy Çatı Ustası
Sivas Evden Eve Nakliyat
Erzincan Şehir İçi Nakliyat
Yozgat Şehirler Arası Nakliyat
Sweat Coin Hangi Borsada
Karapürçek Boya Ustası
Samsun Şehir İçi Nakliyat
Çerkezköy Çekici
67AC2
ReplyDeleteSiirt Şehirler Arası Nakliyat
Amasya Evden Eve Nakliyat
Cointiger Güvenilir mi
Düzce Şehir İçi Nakliyat
Kırşehir Evden Eve Nakliyat
Ağrı Evden Eve Nakliyat
Mexc Güvenilir mi
Ünye Boya Ustası
Osmaniye Şehirler Arası Nakliyat
59061
ReplyDeletehttps://referanskodunedir.com.tr/
7DC61
ReplyDelete%20 komisyon indirimi
77CB6
ReplyDeletereferans
2F490
ReplyDeleteArtvin Yabancı Sohbet
kocaeli sesli mobil sohbet
ığdır telefonda canlı sohbet
zonguldak kadınlarla ücretsiz sohbet
kadınlarla görüntülü sohbet
rastgele görüntülü sohbet
parasız görüntülü sohbet
trabzon seslı sohbet sıtelerı
bolu bedava görüntülü sohbet sitesi
ED0C5
ReplyDeletebatman görüntülü sohbet siteleri
karabük görüntülü sohbet siteleri ücretsiz
çorum sohbet uygulamaları
afyon rastgele görüntülü sohbet
çanakkale ücretsiz görüntülü sohbet uygulamaları
denizli sesli sohbet mobil
bedava sohbet
mobil sohbet et
antalya görüntülü sohbet siteleri ücretsiz
4FE3E
ReplyDeleteTokat Canlı Sohbet Odası
Düzce Sohbet
Tekirdağ Mobil Sohbet
bolu mobil sohbet sitesi
osmaniye sesli sohbet
Aydın Yabancı Görüntülü Sohbet Siteleri
görüntülü sohbet ücretsiz
Bitlis Telefonda Kızlarla Sohbet
goruntulu sohbet
686A9
ReplyDeleteTwitter Retweet Hilesi
Arg Coin Hangi Borsada
Parasız Görüntülü Sohbet
Ceek Coin Hangi Borsada
Cate Coin Hangi Borsada
Bonk Coin Hangi Borsada
Parasız Görüntülü Sohbet
Görüntülü Sohbet
Dlive Takipçi Satın Al
B504B
ReplyDeletequickswap
layerzero
poocoin
defillama
shiba
chainlist
trezor suite
raydium
arbitrum
weedwfewrfvdvgfdg
ReplyDeleteشركة مكافحة حشرات بالاحساء
yghjgyhnj
ReplyDeleteصيانة افران الغاز بمكة
شركة مكافحة النمل الابيض بالدمام DadXvsZ150
ReplyDeleteشركة صيانة خزانات بعنيزة qbXnjRwh3X
ReplyDeleteشركة تنظيف خزانات wcJszMOQG5
ReplyDeleteشركة تنظيف منازل بتنومة sRVwFGvH7h
ReplyDeleteشركة تنظيف كنب بالدمام fvpvNMfsYZ
ReplyDeleteصيانة افران بمكه 8iyFVRA3ZR
ReplyDelete1558BBA4AF
ReplyDeleteAnadoluslot Güncel Adres
Anadoluslot Yeni Adres
Anadoluslot
Anadoluslot Giriş
Trwin Yeni Adres
Trwin Güncel Giriş Adresi
Trwin
Trwin Giriş
Trwin Giriş Adresi
847F220FE5
ReplyDeleteAnadoluslot
Anadoluslot Giriş
Anadoluslot Güncel Adres
Anadoluslot Giriş
Trwin Giriş
Trwin
Anadoluslot
Anadoluslot
Trwin Giriş
94D3A38920
ReplyDeletetiktok takipçi ucuz
beğeni satın al
türk takipçi
bayan takipçi
aktif takipçi