A detailed post about a cheap BlueTooth <-> UART module, often called HC-06, BC417, BT0417C, EGBT-046S, Bluetooth bee, etc.
(Windows user? I have a dedicated post for you, however it only covers the PC-side of the communication. Keep reading this post, and I'll tell you when to switch.)
If you are looking for a cheap and simple way to communicate wirelessly a microcontroller to a PC or to a smartphone, then you should definitively look at the HC-05/HC-06 bluetooth modules, these module are widely available at eBay and DealExtreme, so you can get one shipped to wherever you are.

Both modules have the same hardware, but different firmware. The HC-06 is a slave device, i.e. it can't start the communication (this process is know as pairing in bluetooth jargon) with another device, it needs a master (PC/Smartphone) that pairs with it. On the other hand, the HC-05 is a master/slave device, i.e. it's capable of peer to peer communication with other HC-05 modules, it can be the master of an HC-06 module, it can be a slave of a PC/Smartphone, etc.
Both modules are 3.3V powered and have an 3.3V UART interface, to which we can hook any 3.3V microcontroller or an USB->UART device.
HC-06 setup and configuration
This time, I'll show you how to interface a Ubuntu PC to a HC-06 a.k.a. "linvor" module, which I got from DealExtreme.

Recommended HC-06 Setup (Datasheet)
Upon powering on the module, the LED will start blinking (if there is another bluetooth device in automatic search mode), telling you that the module is alive.
We can now do some configuration via the UART pins (in my case the default baud rate was 9600, in other modules it might be 38400) sending AT commands, the complete list is shown below:
| Command | Response | Comment |
|---|---|---|
| AT | OK | Does nothing! |
| AT+VERSION | OKlinvorV1.5 | The firmware version |
| AT+NAMExyz | OKsetname | Sets the module name to "xyz" |
| AT+PIN1234 | OKsetPIN | Sets the module PIN to 1234 |
| AT+BAUD1 | OK1200 | Sets the baud rate to 1200 |
| AT+BAUD2 | OK2400 | Sets the baud rate to 2400 |
| AT+BAUD3 | OK4800 | Sets the baud rate to 4800 |
| AT+BAUD4 | OK9600 | Sets the baud rate to 9600 |
| AT+BAUD5 | OK19200 | Sets the baud rate to 19200 |
| AT+BAUD6 | OK38400 | Sets the baud rate to 38400 |
| AT+BAUD7 | OK57600 | Sets the baud rate to 57600 |
| AT+BAUD8 | OK115200 | Sets the baud rate to 115200 |
| AT+BAUD9 | OK230400 | Sets the baud rate to 230400 |
| AT+BAUDA | OK460800 | Sets the baud rate to 460800 |
| AT+BAUDB | OK921600 | Sets the baud rate to 921600 |
| AT+BAUDC | OK1382400 | Sets the baud rate to 1382400 |
The AT commands are NOT "NULL" terminated neither need a "RETURN" character at the end. They must be sent as shown in the table, i.e. "AT" command are 2 characters, "AT+VERSION" command are 10 characters, and so on.
If you are using a USB->UART device + minicom or similar to send the AT commands, you are going to run into problems, as the HC-06 expects a full command in less than a second, i.e. you need to type "AT+VERSION" in less than a second. I recommend qSerialTerm instead of minicom, as you can send a full string at once.
OK, that's all we can do with an unpaired module. Let's proceed to pair it with an Ubuntu PC and establish a virtual serial port between the PC and the module.
(Windows users: Go to this post, for a proper configuration on the PC).
Pairing with an Ubuntu PC
First, let's find out the MAC address of the device, using the following command on the terminal:
hcitool scan
The output will look like this:
11:22:33:44:55:66 linvor
Where linvor would be the name of your HC-06 and 11:22:33:44:55:66 would be it's MAC address.
We must now add this information to the rfcomm.conf file, rfcomm is a protocol of serial port emulation of the Bluetooth standard. To do so, type the following command in your terminal:
gksudo gedit /etc/bluetooth/rfcomm.conf
In the text editor that appeared, insert the following text (don't copy the line numbers):
Instead of 11:22:33:44:55:66 use the MAC address of your HC-06 module. You can also use any other rfcomm port like the rfcomm1, rfcomm2, etc.
You should reboot your PC to make all the changes to the rfcomm.conf file effective.
After the reboot you can pair your PC to the HC-06 module, using the following command:
sudo rfcomm bind rfcomm0
Where rfcomm0 is the port you configured in the rfcomm.conf file.
This will pair your PC to the HC-06, you can now use rfcomm0 as a serial port, via minicom or qSerialTerm (more details below), to send/receive data to/from the HC-06 module. As soon as you open the rfcomm, the HC-06 led will stop blinking, and stay ON. On this point, the communication becomes a transparent asynchronous serial communication.
Check this post on how to open/use serial ports without sudo.
Check this post on how to open/use serial ports without sudo.
When you are done with the communication and have closed the rfcomm port, you can use the command:
sudo rfcomm release rfcomm0
To unpair the module and the PC, otherwise the link will stay up until the next shutdown, reboot, logout.
qSerialTerm relies on the QtSerialPort library, and uses two of it's classes: SerialPort and SerialPortInfo. The SerialPortInfo contains methods that detect the available ports, however it doesn't detect the rfcomm ports at this point. The SerialPort works flawlessly with the rfcomm ports, although some manual configuration is needed as the SerialPortInfo class isn't providing information about these ports.

I have modded the qSerialTerm to add support for the rfcomm ports, all the new source code is available in the rfcomm branch (Repository). (The SerialPortInfo issue has been fixed, and the rfcomm branch has been deleted, use the master branch instead)
Now, I'll take a deeper look at the SerialPortInfo class issue. See you later.
I have commited a fix to the QtSerialPort library. Let's see if the reviewers accept the commit.
My commit has been accepted by the reviewers, after lot of nagging from both sides. Now, the master branch of qSerialTerm works with rfcomm devices.
Here is my full testing setup of the HC-06.

Here is my testing session of qSerialTerm with the aforementioned fix applied to the QtSerialPort library.

Using rfcomm on qSerialTerm
qSerialTerm relies on the QtSerialPort library, and uses two of it's classes: SerialPort and SerialPortInfo. The SerialPortInfo contains methods that detect the available ports, however it doesn't detect the rfcomm ports at this point. The SerialPort works flawlessly with the rfcomm ports, although some manual configuration is needed as the SerialPortInfo class isn't providing information about these ports.

qSerialTerm (rfcomm branch)
My commit has been accepted by the reviewers, after lot of nagging from both sides. Now, the master branch of qSerialTerm works with rfcomm devices.
Here is my full testing setup of the HC-06.

HC-06 testing setup. The HC-06 module's Tx/Rx pins are shorted (yellow wire).
Here is my testing session of qSerialTerm with the aforementioned fix applied to the QtSerialPort library.
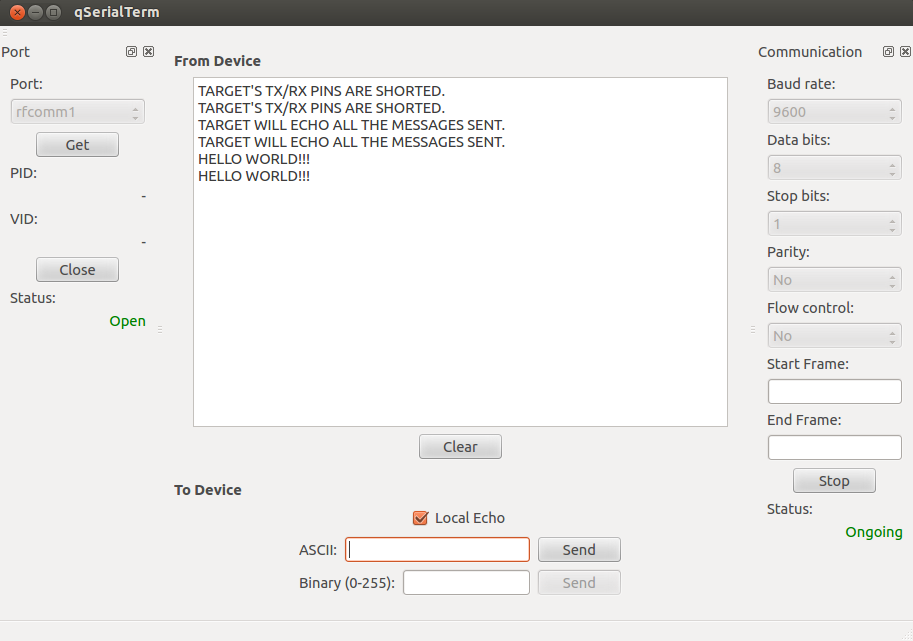
Testing the qSerialTerm (master branch).
Can you tell me anything about the breakout board that you have the module mounted on?
ReplyDeleteThe boards I've seen for these HC-0x modules are typically either a minimalist board with a 3.3v regulator and a pin header, or an ever so slightly larger implementation with a plug on it that seems to be wired to a few i?o lines rather than just the serial TX/RX pair.
Your's appears to be a complete breakout, which piques my curiosity.
Happy hacking, regardless!
http://www.exp-tech.de/Shields/Electronic-Brick-HC06-Serial-Bluetooth-Brick.html
DeleteEmbedded Programmer: Ubuntu: Hacking The Hc-06 Bluetooth Module >>>>> Download Now
Delete>>>>> Download Full
Embedded Programmer: Ubuntu: Hacking The Hc-06 Bluetooth Module >>>>> Download LINK
>>>>> Download Now
Embedded Programmer: Ubuntu: Hacking The Hc-06 Bluetooth Module >>>>> Download Full
>>>>> Download LINK lM
You mentioned that the HC-06 was a Slave device but I believe the HC-06 can be set at the factory as either a master or slave. So care must be taken when ordering.
ReplyDeleteOn a related note. I know that the HC-05 can be programed as both a master or a slave by the end user. Do you know if it will remember the settings after the power is lost?
Like could it be programed as either a master or slave and it would retain that setting until it was programmed otherwise?
HC-06, BC417, BT0417C, EGBT-046S, Bluetooth bee they all have almost the same Bluetooth module hardware
ReplyDeleteI'm confused what master/slave means.. it talks about who starts the connection or the ability to send & receive data.. for example.. can HC-06 send & receive data or just send data?
ReplyDeleteMaster and slave is a bluetooth-protocol-specific thing it has nothing to do when use your HC-0X as a serial device and doesn't affect the "duplexnes" of serial communication. To answer your question: HC-06 can send and receive data.
DeleteIn most situations its independet if you have a master or slave version of the hc-06. Most master devices can be set to slave and you can set a policy on that device what should happen if a master conncets the master if the device should switch automatically to slave-mode or not,... All cheap Bluetooth-USB-Sticks for PCs can do that, so its no problem to connect your HC-06 M/S on your Arduinos.
If you want to talk from one HC-06 to another or more HC-06 then you have to watch out. One Master is necessary the others can be slaves.
Hello,
ReplyDeleteUnfortunately I've hit a brick wall in my project and I hope to utilize your help. I'm trying to send serial data to my new Android phone(S4) from two different Arduino UNO's. So far, I have managed to establish a connection and read serial data between ONE arduino and my phone, utilizing a phone application named "BlueTerm" and of course the HC-06. I am really looking for proper guidance on how to connect TWO arduino UNO's (each with the HC-06 bluetooth module) to my Android phone in order to analyze the serial data from each micro-controler. The data I am analyzing come from two each light sensitive resistors. Any help will be much appreciated. Cheers.
They're TRANSPARENT serial links! Plug them in and they function EXACTLY like a normal serial cable.
DeleteThere is no fancy support for star or mesh networks, it's just a simple serial connection. Write an application using QTserial and have it read both serial ports connected to your Android. There is no other way to do this, they both have to connect to a platform that will read two ports.
There's some great serial bluetooth apps on the play store - look for Bluetooth Serial.
DeleteThank you, you've saved my day!
ReplyDeletePerhaps it's worth mentioning, that computer host must be set as "bluetooth-visible".
hello,
ReplyDeletei just powered on my module via 3.3 v supply b and worked fine(Detectable)but after two three tries the led has stopped blinking on powering up like forever..!! Does it mean my module has died.? but when connected to uart it is sending some random data on serial port..!!
what is it and possible reasons..!!
please help asap..!!
Hello,
ReplyDeleteI have been trying the BAUD rate of mine, it's been hours. And I can't make it.
I have followed your instruction. Connected it to my PC using a USB to TTL UART cable.
I did bind it to the rfcomm0.... but when Putty opens it, the LED keeps on blinking. I never get the fix/continuos LED. And I can't send any command to it.
Do you have any idea of what might be happening?
It's so strange...
Thanks for the insights. You have the best guide on the web for these modules
Hello, Pedro Simão
DeleteConnect it to your PC via USB to TTL UART cable such pinout
Pin RX (HC-06) to connect the TX (USB to TTL Uart)
Pin TX (HC-06) to connect the RX (USB to TTL Uart)
Pin GND (HC-06) to connect the GND (USB to TTL Uart)
The light flashes when there is no connection with another Bluetooth device and steady when a connection is made.
Hello,
ReplyDeleteI'm have Fedora20 on my laptop.
Fedora can't recognized the HC-05 SPP profile. I shows just "UNKNOWN" device.
Do you have an experiance on Fedora linux?.
well written article, thanks for posting.
ReplyDeleteMy Recent Post aquaris m10 fhd ubuntu tech specs
Embedded Programmer: Ubuntu: Hacking The Hc-06 Bluetooth Module >>>>> Download Now
ReplyDelete>>>>> Download Full
Embedded Programmer: Ubuntu: Hacking The Hc-06 Bluetooth Module >>>>> Download LINK
>>>>> Download Now
Embedded Programmer: Ubuntu: Hacking The Hc-06 Bluetooth Module >>>>> Download Full
>>>>> Download LINK
Mardin
ReplyDeleteistanbul
Çanakkale
Antep
Elazığ
4YZ
amasya
ReplyDeletesinop
çorum
sakarya
van
0KAN25
Tokat Lojistik
ReplyDeleteKonya Lojistik
Mersin Lojistik
Karabük Lojistik
Samsun Lojistik
Q8CYH6
08E31
ReplyDeleteSiirt Parça Eşya Taşıma
Sakarya Şehirler Arası Nakliyat
Antep Şehir İçi Nakliyat
Karapürçek Fayans Ustası
Gate io Güvenilir mi
Kilis Lojistik
Tokat Parça Eşya Taşıma
Erzincan Lojistik
Silivri Çatı Ustası
76669
ReplyDeletebinance %20 komisyon indirimi
75040
ReplyDeleteSohbet Uygulamaları
rastgele sohbet
bedava sohbet chat odaları
van sesli sohbet mobil
zonguldak sesli mobil sohbet
Mersin Canlı Sohbet Odaları
görüntülü sohbet yabancı
erzincan ücretsiz sohbet uygulamaları
kilis canlı görüntülü sohbet uygulamaları
Thank You and I have a nifty give: Who House Renovation home remodeling contractors near me
ReplyDeleteCool and I have a swell present: Where To Loan For House Renovation home remodeling services
ReplyDeleteF6DBDBEB04
ReplyDeleteinstagram takipçi paketi mobil ödeme
E3B8AE57ED
ReplyDeletedüşmeyen takipçi
İdle Office Tycoon Hediye Kodu
Danone Sürpriz Kodları
War Robots Hediye Kodu
PK XD Elmas Kodu
Erasmus Proje
Hay Day Elmas Kodu
Happn Promosyon Kodu
Binance Referans Kodu
870FDC1D89
ReplyDeletetwitter takipçi
101 Okey Vip Hediye Kodu
Viking Rise Hediye Kodu
Pokemon GO Promosyon Kodu
Yalla Hediye Kodu
Zula Hediye Kodu
Erasmus Proje
Dude Theft Wars Para Kodu
Pokemon GO Promosyon Kodu
شركة مكافحة النمل الابيض بالجبيل 3XeYSwMJdt
ReplyDelete