Showing posts with label Productivity. Show all posts

Friday, February 1, 2013

Graduating from Ubuntu and moving to Arch Linux


Arch Linux, a rolling release and highly customizable GNU/Linux distribution

I've recently left Ubuntu and migrated to a new GNU/Linux distribution: Arch Linux. The process wasn't easy, as the learning curve of Arch Linux is steeper than the Ubuntu learning curve, but it has been immensely gratifying. This metamorphosis has taught me more about Linux that what I could have learned from staying in Ubuntu.

Not only have I learned new things but I have built a fully customized Operating System that fits my needs and boosts my productivity. This is the main difference between Arch Linux and Ubuntu, the former comes with the bare minimum to run, whereas the latter comes with batteries included. This implies the Arch user must choose his/her Desktop Environment, his/her Development Tools, his/her Media Player, his/her Web Browser, etc.

This plethora of choices may be overwhelming for the newcomer but this ultimate freedom is Arch Linux strongest feature. I believe that thanks to being forced to choose, the user will ultimately find what best fulfills his/her needs instead of sticking to the default, which may not be the optimum. This search for the best apps may be time consuming, but I think it eventually pays off in terms of productivity and conform.

Now, without further ado, I'll share my findings, what works the best for me, and I hope this insight will help you in building your ultimate Operating System.

Standing on the shoulder of giants


The Arch Linux philosophy (The Arch Way): The user has complete control and responsibility over ther system

It's important to mention that a I've received a lot of help into building and tweaking my system from the Arch Wiki. The information contained there has taught me a lot about how Linux works, has saved me lot of time troubleshooting problems and has provided helpful insight on selecting and setting up software.

On the cutting edge, with great power, comes great responsibility


And Ubuntu 12.10 uses the version 3.5 of the kernel

Arch Linux is a rolling release distribution, this means you won't see a new version of Arch Linux coming out every 6 months, like Ubuntu does. Instead you get access to new software as soon as it has been tested to be relatively stable.

This means you'll live at the cutting edge and have access to the latest features implemented in your favorite software, but also means you should be ready to tackle the bugs that may come with the latest software.

The User Repository: Build It Yourself!


The most voted user packages in Arch Linux

As with other GNU/Linux distributions, you can easily install software from the packages available in the official repository using pacman, the Arch Linux package manager. But there are times when you need a software that isn't available in the official repository. On many distributions this either means that you are on your own and will need to compile the software from source, or you depend on someone who might have built a binary compatible with your distribution/version.

On Arch Linux, you have the AUR (Arch User Repository), where the build instructions (PKGBUILD) are uploaded. This means that you'll build yourself a binary that does work with your system. And for the exciting part, AUR has system for commenting, voting and flagging outdated packages. This means that the community will be alert and vigilant about the correctness of the build instructions.

The Desktop Environment: From Unity to Gnome 3


IMO, out of the box Gnome 3 looks better than out of the box Unity
(Images from ubuntu.com and gnome.org)

My first Linux distro was Ubuntu 11.04, Natty Narwhal, and I arrived just in time to test Unity, which became the default GUI in that release. Coming from the "W" OS, the change was abrupt, and for me it was a total redefinition of the desktop experience.

I quickly became attached to the feature of workspaces, which are common in Linux Desktop Environments, and even established the policy of having one application per workspace for faster switching, instead of alt-tabbing through many apps.

I loved the concept of adding extensions to the top panel for extra information and features, but to the date I still don't understand why some people use the application extension, that just reminds me of the start menu from the "W" OS (ewww), I guess some habits die hard.

I also liked the Unity Lens, a desktop search mechanism, until Canonical decided to add the opt-out Amazon search...

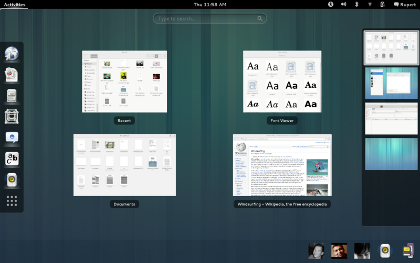
Out Unity, enter Gnome 3!
(Image from www.gnome.org)

But enough of reminiscing, and fast forwarding to my migration to Arch Linux. Just after I installed the base system and had to select a Desktop Environment, I found out that Unity was not in the official repositories and I didn't know at that time about AUR. In need of a new DE, I choose the most similar to Unity: Gnome 3.

And Gnome 3 just rocked my world:
  • It just looks better than Unity!
  • Do you like workspaces? We have dynamic workspaces
  • Do you like the top panel? You can install and manage your extensions from the web
  • On Unity, the Super key only let's you search/launch apps, on Gnome it launches the Activities Overview, where you can do the same but also switch apps/workspaces and close apps in the current workspace
  • I love the hot corner, it launches the Activities Overview using the mouse, and I use it to switch applications/workspaces when my hand is already on the mouse
  • Notifications! (not available in Unity), they are just awesome, many apps can report useful information in an unobtrusive way with these notifications

On the way of Vim


Vim, the fastest editor in the world (?)

Continuing with the productivity improvements, I decided to try the legendary vim editor. Many things are said about vim like: "vim allows you to edit text at of the speed of thought". I'm not quite there yet, but releasing yourself from the mouse does speed up the editing, but only if you're a touch typist and after you have quite a bit of practice with this editor.

The learning curve is quite steep, when I started with vim my productivity went down, but after the struggle of learning the basics I was back to normal. What gives you the real boost are vim superpowers, namely: buffers, windows, the infinity of plugins and some stuff I haven't heard about yet.

To stay committed to my learning of vim, I'm forcing myself to use vim, by enabling it wherever it's possible:

I think you get the point... The side effect is that I'm improving my productivity daily!

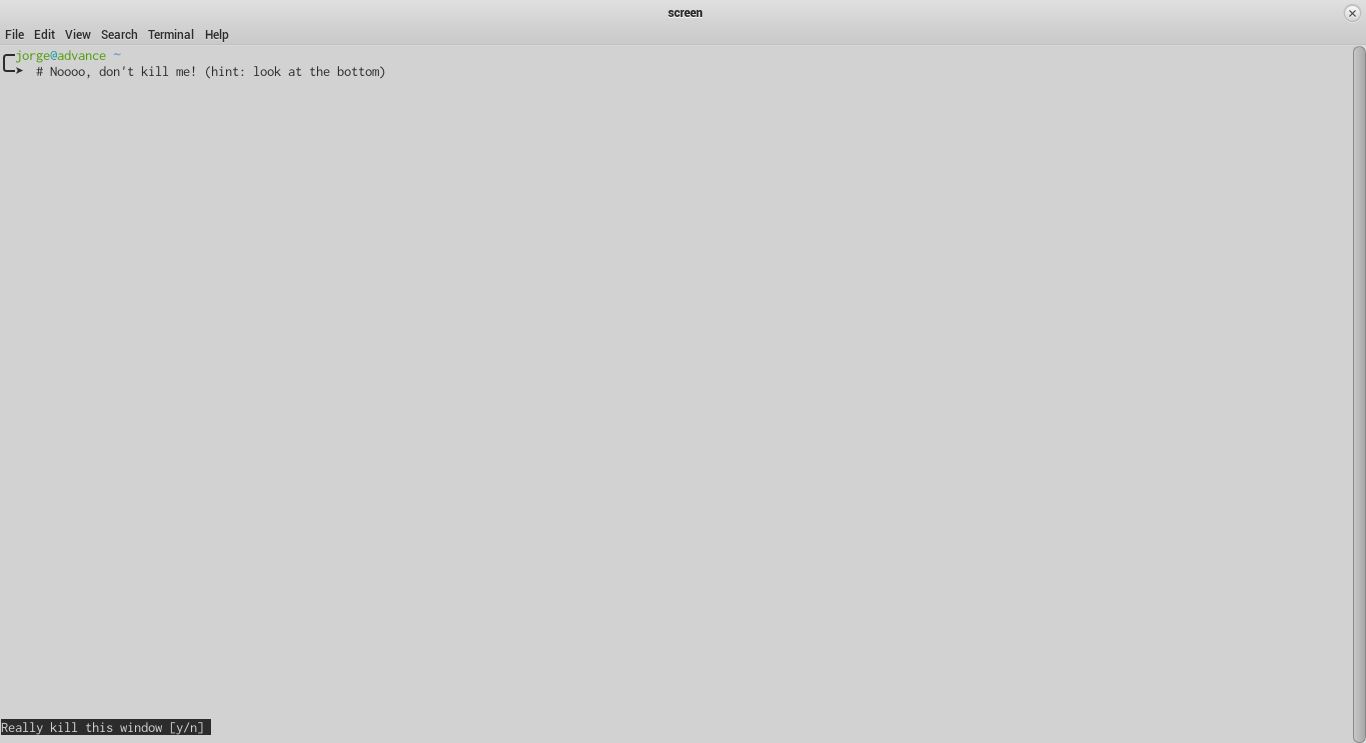
Drop Down Screen for the win


Always available command line applications with the Gnome Drop Down Terminal and Screen

I'm a heavy user of the command line, I prefer using the keyboard that using the mouse, and pressing a key shortcut is always faster than moving the mouse to some menu and selecting an action.

Therefore I needed a way of quickly accessing multiple terminals. Opening and closing terminal when needed resulted in launching delays, and having multiple terminal windows open only added clutter to the desktop.

With Drop Down Terminal you can have a terminal permanently open, which can be hidden from view without closing it and called it back without the launching delay. And Screen lets you manage multiple command line applications in one terminal.

For more information you can check my post: Multitasking in the command line with Screen.

Conky, the system monitor


Conky, the customizable system monitor

Accessing your system information is important to spot any CPU/memory leak, or to monitor the network bandwidth usage, among other tasks related to maintenance.

You can have pretty much all of this information by adding gnome extensions called indicators. But there are three problems with this approach:

  • You'll fill your top panel with a lots of indicators, leaving little space for other extensions.
  • Again, due to limited space you can only view a small piece of information for each indicator.
  • To access a more detailed report, you'll need to click on each indicator, which is slow and energy consuming.

As you can see in the screenshot above, Conky lives in your desktop and let's you access all the information you need/want thanks to its .conkyrc file, and also solves the three problems of the indicators:
  • With Conky, you can get rid of all or most of the indicators in the top panel.
  • You can customize Conky to display all the information you want/need.
  • You can easily access to Conky using a keybinding to show the desktop, which is way faster than the mouse.


The Z shell, like bash but improved


bash + better autocompletion + lots of themes + auto cd + git integration + ... = zsh

Bash is a great shell, but the Z shell is easier to customize, which can give you superpowers if correctly customized. Using the out of the box version of zsh feels a lot like bash, but thanks to the project oh my zsh, you can get a fully customized zsh that beats vanilla bash.

These are the most relevants features of zsh customized with "oh my zsh", that beat bash:
  • Case insensitive auto completion.
  • Double tab, let's you choose among the list of suggestions.
  • Auto cd, you don't need to type the cd command, typing only the name of the directory is enough to change the file path.
  • With the Git integration, you can add to the shell promp information about the git repository you are currently in.

MPD: The daemon of music


MPD + ncmpccp, a ncurses based client.

The Music Player Daemon (MPD) is a daemon (a process that runs in the background) that uses your audio device to play music stored in a certain folder (the database) according to the order established in the playlist folder.

However to send commands like play, pause, next, etc to the MPD, a client is necessary. My choice of client is ncmpccp, which is a terminal based client that uses the ncurses library to implement a user interface.

The rationale of the selection, is again that the keyboard is faster than the mouse, also not having a GUI saves resources and finally this client can be integrated in my drop down Screen.

I have also installed mpDris2 and a gnome extension to control MPD via the top panel, this combination also enables notifications, which you can see in the above screenshot.

That's all!


Those are the applications I use everyday and that have boosted my productivity. There are many other applications that I use but they may not be so useful for the average user.

If you are an Archer, please feel free to share your favorite application in the comment section.

Thursday, January 31, 2013

Screen: Multitasking in the command line

Multitasking Octave and Python with Screen. (Don't ask why, it's an example)

"Screen is a full-screen window manager that multiplexes a physical terminal between several processes, typically interactive shells." - definition from GNU Screen website.

As the definition says Screen allows you to run multiple processes/shells in one terminal, this is priceless when you are sshing a remote server. However you can use the powers of Screen to do some command line multitask in your everyday life.

I'll cover how I use both Screen and the the Gnome Drop Down Terminal (alternatively Guake can also be used). If you use Guake, you might say: "but I already have tabs in Guake, I don't need Screen". That's as debatable as the topic of Buffers vs Tabs in Vim, but everybody knows that Buffers beat Tabs everyday (OK, that's just my opinion).

Basics of Screen


Install Screen from your distro repository if you haven't already. And let's see what Screen can do.
# Try this command
screen
Notice the gnome-terminal screen now says "screen" in the title.

Some splash screen appears, you press enter and then looks like nothing happened... But something did happen, you are now in a Screen session!
# Try this command on your current window
top
You'll now see your running processes order by CPU usage. Now type: 'C-a c' (press both Ctrl and A, release both keys and then press the C key).

Creating a new window in a Screen session.

You have just created a new window and you watching this second window. The command top is still running in the first window, just that is not visible. You can switch between these two windows using 'C-a n' or 'C-a p'.

Finally, you can "kill" a window using the command 'C-a k'. You'll see a prompt at the bottom, asking if you really want to kill window. Killing a window also terminates the process contained in it.

Killing a window an a Screen session.

There are other commands, you can learn more about them using the help command 'C-a h'. There is another important feature of Screen named attaching/detaching, which is extremely useful for ssh connections, but I won't cover that here as it's not necessary to do the multitasking, as you'll see soon.

How do I know if I'm in a Screen session?


I can't visually tell whether I'm in a Screen session or not.

If you run screen inside a a GUI terminal like the gnome-terminal, is easy to notice that you are in a Screen session because the title changes to "screen". On Guake is also easy to notice, as the tab name changes to "screen" accordingly.

But on the Gnome Drop Down Terminal you've got no way to tell. You can't tell either if you are on an X-less login session. At less not visually, but you can always test if 'C-a h' displays the Screen help.

A better way of telling Screen session apart is adding a status line, this line can also display other important information. Before adding that feature, we need to lean about the screenrc file.

screenrc


As with many other applications, Screen has a rc file that executes certain commands at every startup, you can think of it as a configuration file. We'll work with the .screenrc file found in your home folder, that rc file only works with your current user account.
# Creating/editing the screenrc file
vim ~/.screenrc
To turn off the startup message you can add this line to your .screenrc file:

Screen status


To add a nice status line to Screen, you must append the following lines to your .screenrc file. (Source: Arch Linux Forums)
The Screen status line displays the hostname, a list of windows, the date and the time.

Launching a set of applications on every Screen call


To start Screen with multiple windows and each window containing an application, add the following lines to your .screenrc file.
On Screen the windows are numbered starting from 0. The final command selects which window will be active at startup.

For example, to start Screen with two windows, the first containing octave and the second containing the shell; and start with the shell window active, you'll need the following lines:
Start Screen with Octave and a shell (zsh in this example)

Keybindings


Remember the command we tested at the beggining of this post? Well, we can map them to single keys for faster accessing. The following lines do just that, append them to your .screenrc:
Each keybinding has a description right next to it, for your reference.

Drop-down Multitasker Terminal


As a final step let's integrate Screen to a drop down terminal for the ultimate command line multitasking experience.

Gnome Drop Down Terminal


For the Gnome Drop Down Terminal, the process is straightforward: Simply head to the preferences of the extension and select screen as the custom command to run instead of the shell.

Use Screen instead of the default shell in the Gnome Drop Down Terminal

Gnome Drop Down Terminal + Screen

Guake


You can start Guake with some applications in it at startup as I explained in an old post (I used Octave as an example in that post). But using Screen and the .screenrc file is way simpler!

You'll need to run 'guake -e screen' instead of just guake, and the screenrc file will take care of launching your apps.

The easiest way is to configure Guake as a startup application.

Launch Guake with Screen inside it at startup.

Screened Guake

I hope this post was useful to the heavy users of the command line and also pushes the casual users to get into it.

Vim for Python Development

Testing a PyOpenCL demo in vim.

This is my collection of hacks that turn vim into a python IDE.

Syntax Highlighting


I'm using Arch Linux and Syntax Highlighting comes installed with my Vim package. I just need to enable the syntax highlighting in my .vimrc file:

Enable line numbers


Is as simple as adding this line to the .vimrc

Indentation


Adding this to the .vimrc file will enable PEP8 indentation only for *.py files.

Autocompletion


I use the great jedi-vim plugin from David Halter and the SuperTab plugin. You can find the installation steps at RedKrieg's post: Writing Python like a Jedi.

Testing the jedi-vim plugin

Executing python code inside vim


This is my favorite, press the F5 key to save the python script and execute it. Add this to the .vimrc file.

Enable file specific features


To enable all the filetype features I've defined above the following lines are needed in the .vimrc file.

Other plugins


Here is a collection of other useful plugins, I recommend installing them using pathogen if you can't get them from the repositories of your Linux distro.


If you have hacks of your own, please share them with everyone in the comments section.

Monday, January 28, 2013

Augmenting Octave with Vim

Integrating the powerful mathematical package, Octave, with the flexible editor, Vim.

Today, I'm sharing some tips to use the vim editor inside the Octave interactive command line.

The octaverc file


The first thing towards customizing Octave is creating an .octaverc file, if you don't have one already. The .octaverc file holds some Octave commands that are executed every time you launch Octave.

We'll work with the .octaverc file that lives in your home directory, which is user specific.
# Create/modify .octaverc in your home folder
vim ~/.octaverc
A good starting .octaverc file looks as follows:

Using vim as editor in Octave


Next, let's set vim as the default editor in Octave. (source of information)
# Add extra configuration
vim ~/.octaverc
Open the .octaverc file and append the following:
Now you can call vim from within Octave, and use it in command line mode, i.e. without opening an (unnecessary) additional window.

As a bonus you get a function template.

Now, let's tweak vim for extra features!

Adding syntax highlighting


We'll add syntax coloring/highlighting to vim. Similar to the .octaverc file, vim also has a configuration file named .vimrc. Before touching the .vimrc file, you'll need to grab a vim syntax file from here (grab the latest version).

Next you'll need to drop that octave.vim file in the following directory: ~/.vim/syntax.
# If you don't have the folders already
mkdir -p ~/.vim/syntax
mv /path/to/downloaded/octave.vim ~/.vim/syntax/octave.vim
Next, you'll need to append the following lines in your .vimrc file.
Let's try editing a file inside Octave again.

Added Octave syntax highlighting for vim.

Execute Octave scripts from within vim


Here is where the magic comes in. With this hack, you'll be able to test the octave script you are editing in vim, inside vim and without leaving vim. In other words, you'll be able to use the F5 key to run your script, just like you do in the Matlab editor.

Without further ado, you'll need to add this to your .vimrc
Let's test the magic.


Executing an Octave script from within vim using the F5 key in normal mode.

I need to inform you that this hack adds two extra lines of code to your script:

"pkg load all" at the beginning of your code. Which grants access to all functions inside the extra Octave packages.

"pause" at the end of your code. Without this you won't be able to see the plots drawn in your script.

When the execution of the script finishes, these two lines are removed.

That's all folks, happy coding!

Tuesday, June 5, 2012

Ubuntu Tip 01: Octave on Guake Terminal at Startup

UPDATE: I recommend using Screen to manage multiple applications in a terminal, you can use it with Guake as well. Check this post.

The Guake Terminal


Are you heavy user of the Command Line Interface (CLI)? Yes? Have you heard of guake? No? Well, guake is a nice program that allows you to invoke and hide the gnome terminal with one key stroke.

Using guake saves time on launching/closing the gnome terminal multiple times, because guake always uses the same instance of the gnome terminal.

Installing guake is easy, it's in the ubuntu universe repository, only type the following command in your terminal.

sudo apt-get install guake

You can now launch guake via dash (super key) or via command (Alt + F2).


Guake is now running, you can show/hide it using the F12 key. Other useful shortcuts are (Ctrl + Shift + T) which opens a new tab in the terminal, (Ctrl + PgUp/PgDown) which cycles through the tabs and F11 which toggles on/off the full-screen mode.

OK, time to do some customization, launch guake preferences (via dash), you can modify various settings like background color, font color, transparency, windows height, etc. Be creative!


In case you are wondering, the default background color of the gnome terminal (which I'm using) is #300A24.

Let's move to octave now!

Octave


GNU Octave is a high-level language, very useful for numerical computations in engineering and science. If you have used MATLAB before, Octave is pretty much the same, only that it's open source.

You can get octave (version 3.2, which is kind of old) from the universe repository, using the following command.

sudo apt-get install octave

Octave runs from the Command Line, so let's call it from the guake terminal.


Now we have an easy access to a powerful calculator, let's make a script that launches guake with octave inside it at startup.

Putting them together at startup


Type the following commands in the gnome terminal.

cd ~
mkdir scripts
cd scripts
gedit guake-octave.sh

On the text editor that popped paste the following code (don't copy the line numbers):

Save the .sh file, and let's make it executable using the following command.

cd ~/scripts
chmod 755 guake-octave.sh

Let's add this script to the startup applications. Launch startup applications from dash.


Click on the add button, add some description and browse to the script file.


We're done. Reboot and start using octave as a calculator, plotter, etc.


MUST SEE: How to augment Octave capabilities using Vim.